EASS 2022
- Admin
- Technical debt
- Business logic
- Bash and commandline (based on MIT's missing semester)
- Git, GitHub
- Interactive class
 { width=150px }
Admin stuff
- Discord
- Github account
- HW on Github
- Creating a Canvas account (https://canvas.instructure.com/)
- Accepted invitation from AWS Academy and GitHub (I have sent links)
- AWS on Cavnvas
- Commandline (WSL)
- Docker
- Moodle (minimal interaction over there)
- Volunteer to summarize the lectures
- Stackoverflow
- Engagment on Discord
- Hackernews
References:
Missing Semester MIT
AWS cloud certificate
What is Technical Debt?
-
"In software development, there is always a constant need to balance speed and quality. Some quality will always have to be sacrificed to release features within a reasonable timeframe, so any of these shortcuts will often be tasked as future projects. Those unattended tasks become what is called technical debt."
-
"There are several reasons why technical debt happens. Product owners may focus more on the need to implement and release new features and less on fixing past problems or create a generic enough infrastructure to support future developments. In some severe cases, product owners completely underestimate the outcomes of dealing with poor infrastructure, bugs and poorly designed software."
-
"Ultimately, technical debt can sometimes lead to software users having bad experiences and thereby increasing user churn rates. Together, a lack of developer awareness and task ownership can lead to more technical debt."
References:
https://logz.io/blog/technical-debt/
Business logic
-
"Business rules are what your non-software developers tell you what your software needs to do."
-
"Business logic is the part of your code that specifically implements business rules."
 { height=200px }
References:
https://softwareengineering.stackexchange.com/questions/234251/what-really-is-the-business-logic
http://www.ritholtz.com
Intro to commandline and tools (interactive)
- Vim
- Bash
- Git
- Docker
Bash
Important tools and commands
echo,while,find,vars,printenv,htop, shebang, wild cardscp,touch,mkdir,ls,uniq,awk,rmman manbrewwgetcurl
References:
https://missing.csail.mit.edu/2020/shell-tools/
Sneak peek to docker
docker rundocker psdocker run -ti
Stackoverflow good questions usually have
Must have:
- Problem statement
- Sample code and data
- Spelling, grammar and formatting
Example:
https://stackoverflow.com/questions/11227809/why-is-processing-a-sorted-array-faster-than-processing-an-unsorted-array
References:
https://codeblog.jonskeet.uk/2010/08/29/writing-the-perfect-question/
https://stackoverflow.com/help/how-to-ask
First task
- Checkout github classroom and the first task about git and github https://classroom.github.com/classrooms/99552739-eass-hit-2022-part-a
AWS course (due a week after Passover == April 30, 2022)
- S3, EC2, RDS, and EBS modules
- must get 100 on all 4 modules
- grading will be 25% per module
A bit more about EC2 instances and types of hardwares (HW)
EC2 provides secure, resizable compute cloud services. It makes web-scale cloud computing easier and offers HW such as:
- ARM vs. Intel vs. AMD (x86, x86_64)
- GPUs (Nvidia, Intel)
- TPUs (on Google Computing Platform)
- Metal instacnes on AWS
- FPGA-based nodes
Instance Types and prices (useful links)
https://aws.amazon.com/ec2/instance-types/
https://instances.vantage.sh/
Instance Types (summary)
- General Purpose
- Compute Optimised
- Memory Optimised
- Accelerated Computing (P instances are for general-purpose GPU applications)
Pricing
There are four ways to pay for EC2 instances: On-Demand, Reserved Instances, and Spot Instances & Per-Second Billing. You can also pay for Dedicated Hosts which provide you with EC2 instance capacity on physical servers dedicated for your use.
First task on Git and GitHub
Checkout github classroom and the first task about git and github
https://classroom.github.com/classrooms/99552739-eass-hit-2022-part-a
How to test our code/system
General approaches for testing
- Static vs. Dynamic
- Passive testing
- White-box vs. Black-box testing
Types of testing coverage metric
- API testing – testing all public and private APIs Code coverage – creating tests to satisfy some criteria of code coverage (e.g., the test designer can create tests to cause all statements in the program to be executed at least once)
Types of tesing systems (CI/CD)
- Unit vs. Integration testing
- System testing
- Compatibility testing
- Installation testing
- Smoke and sanity testing
- Regression testing
We will use pytest and fastapi testing system
- https://fastapi.tiangolo.com/tutorial/testing/
- https://docs.pytest.org/
All exercises
- 4 modules on AWS course (S3, EC2, EBS, RDS) - if you finish all the course you get +10 bonus points to final grade
- Build full REST/HTTP fastapi backend + Dockerization (due 1/4)
- UI (react/streamlit) (due 1/5)
- Docker compose the server with UI and backend plus server and write a clear README with git submodules (due 29/5)
- Presentation of the system in a demo in a 2-3 minutes video on youtube and clear README (due 29/5)
Ideas for porjects next semester (based on skills we will learn this semester)
- AI/ML based predictive system
- Smart contracts (web3)
- Any other system with at least 3 microservices
List of the subjects in our course
- Monolithic vs. Microservices
- Docker
- Client-Server
- REST/HTTP API
- FastAPI
- Pytest
- asyncio
- Frontend (React javascript and Streamlit python)
- Docker compose
- Functional programming
- How to compile a new library
What Are The Best Software Engineering Principles?
Measure twice and cut once
 { width=300px }
Based on this nice post
https://luminousmen.com/post/what-are-the-best-engineering-principles
What Are The Best Software Engineering Principles?
Don’t Repeat Yourself (DRY)
If any code occurs more than twice in the codebase, you should think of moving it in a separate function. In fact, you should consider creating a separate method even if you encounter repetition a second time.
 { width=300px }
What Are The Best Software Engineering Principles?
Keep It Simple -Stupid- (KISS)
Some think that this idea transformed from Occam’s Razor philosophical principle. You can interpret it as follows: one should not create extra entities to the system without a strong necessity. It is always a good idea to first consider the usefulness of adding another method/class/tool/process, etc.
What Are The Best Software Engineering Principles?
You Aren’t Gonna Need It (YAGNI)
Don't implement all the "necessary" (most likely unnecessary) functionality at once from the very beginning of the project.
 { width=300px }
What Are The Best Software Engineering Principles?
Avoid Premature Optimization
"Premature optimization is the root of all evil (or at least most of it) in programming" — Donald Knuth
Watch Knuth on a talk with Lex Friedman https://www.youtube.com/watch?v=EE1R8FYUJm0
Principle Of Least Astonishment
This principle means that your code should be intuitive and obvious, and not surprise another developer when reviewing the code.
Law of Demeter (Olympian goddess of the harvest and agriculture)
The basic idea here is to divide the areas of responsibility between classes and encapsulate the logic within a class, method, or structure.
- Decoupling You should try to reduce the number of connections between different classes or entities
- Cohesion The associated classes must be in one module/package/directory
SOLID - create code that is easy to maintain and extend over time
-
Single responsibility states that every module or class should have responsibility for a single part of the functionality and that responsibility should be entirely encapsulated by the class
-
Open-closed states that software entities (classes, modules, functions, etc.) should be open for extension, but closed for modification
-
Liskov substitution states that any inherited class should complement (substitutable), not replace, the behavior of the base class
-
Interface segregation states that no client of the class should be forced to depend on methods it does not use
-
Dependency inversion says that programmers should work at the interface level and not at the implementation level
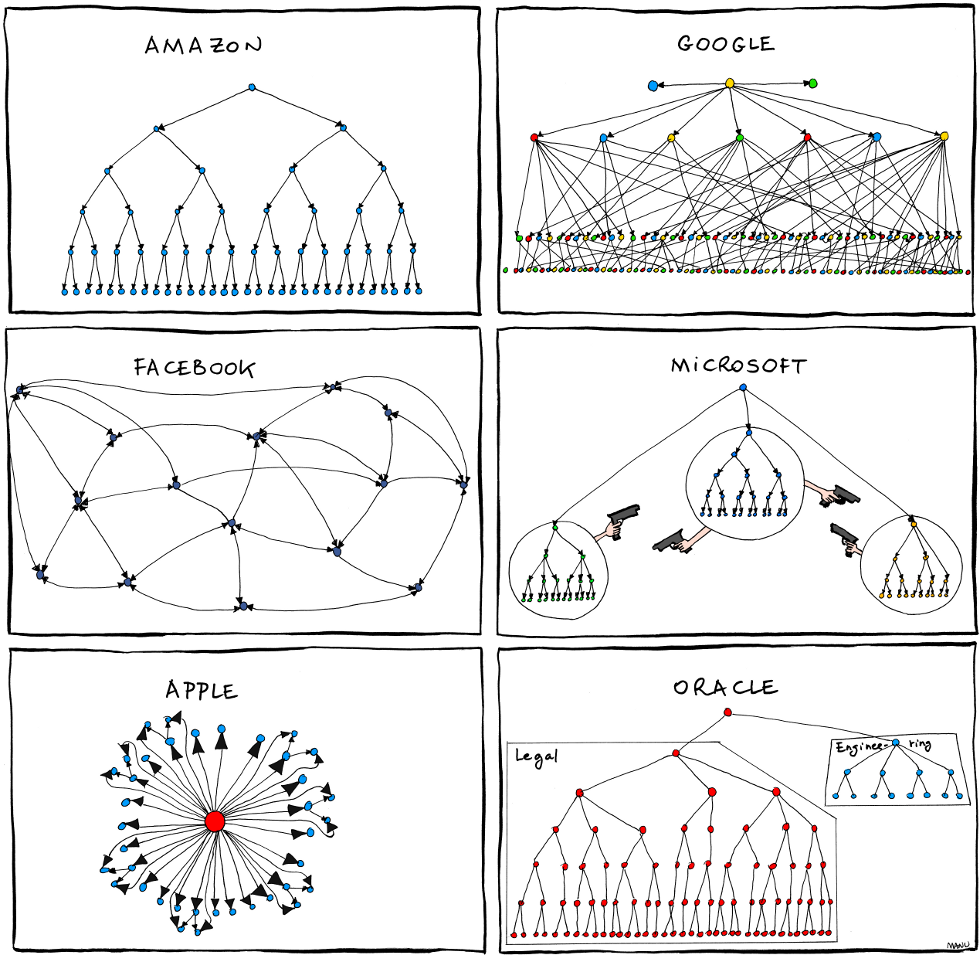
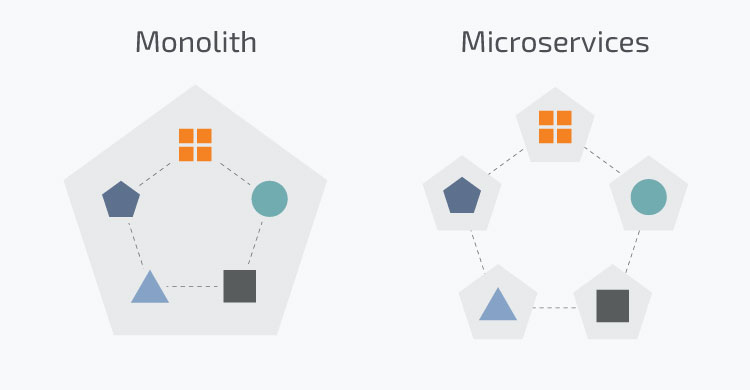
Monolithic vs. Microservices
-
Monolithic application is a single unified unit that contains all the logic in one entity
-
Microservice architecture breaks the application down into a collection of smaller independent units
 { width=300px }
Further reading material
https://www.n-ix.com/microservices-vs-monolith-which-architecture-best-choice-your-business
Monolithic vs. Microservices
 { width=400px }
Monolithic vs. Microservices
 { width=400px }
Docker
- Dockerhub/Registry
- Dockerfile
docker builddocker rundocker psdocker network lsdocker volumesdocker expose portsdocker imagesdocker execdocker image prune -a
Further training material
https://training.play-with-docker.com/alacart/
https://towardsdatascience.com/twenty-one-techniques-and-five-concepts-for-better-docker-usage-9ee135dccdc9
Advanced "Setting up a reverse proxy server" (How Docker makes our life easier)
"A very common scenario for developers, is to run their server behind a reverse proxy that sits in front of web servers and forwards client/frontend (e.g., web browser) requests to the web servers ("backend"). There are many reasons why you would want to do this but one of the main reasons is to run your API server on a different network or IP then your front-end application is on. You can then secure this network and only allow traffic from the reverse proxy server. For the sake of simplicity and space, I’ve created a simple frontend application in React.js and a simple backend API written in Node.js. Run the following command to pull the code from GitHub."
Without docker this is not easy to do.
Soon we will see how Docker simplifies the process of building a server that run a reverse proxy
Go through (reverse proxy, react, nginx):
https://www.docker.com/blog/how-to-use-the-official-nginx-docker-image/
Using Docker nginx walkthrough an offical tutorial together
https://www.docker.com/blog/how-to-use-the-official-nginx-docker-image/
docker run -it --rm -d -p 8080:80 --name web nginxcurl http://localhost:8080docker stop web- Add
index.htmlto local site-content and map it to/usr/share/nginx/html(https://gist.github.com/chrisvfritz/bc010e6ed25b802da7eb) docker run -it --rm -d -p 8080:80 --name web -v ~/site-content:/usr/share/nginx/html nginx- Doing stuff via Dockerfile (
docker build -t webserver):
FROM nginx:latest
COPY ./index.html /usr/share/nginx/html/index.html
docker run -it --rm -d -p 8080:80 --name web webserver
Recap - linux commands everyone should know
host/network commands
ipifconfighostnamewhoamiunameping
file-realted commands
mkdirrmdircpmv,rmcdls -lfindwcxxddu -h /chownchmod
archives:
zip,targzip,unzip,gunziptar -czvf name-of-archive.tar.gz /path/to/dir-or-file
c - create, v verbose, f - allow to chose the name
Recap - linux commands everyone should know
more commands
cattouchecholocatewhereiswhichfindgrepdfduawkheadtaildiffjobs(to see background jobscommand&)kill(sending signals to processes)
SIGTERM (15) -- requests the job to stop
SIGKILL (9) -- forces programs to stop
wgetcurltop,htop,brew(should be installed),apt-install
How microservices talk to each other
What is API?
API stands for Application Programming Interface. This interface allows users to build upon another application's functionality.
What is web API?
Web API is when other SW services uses other application's/service's functionbality over the web/network.
What is HTTP?
HTTP stands for Hypertext Transfer Protocol: an application layer protocol in the Internet protocol suite model for distributed, collaborative, hypermedia information systems. - http://facebook.com - https://facebook.com
How microservices talk to each other
GET method
GET /microservice/v1/function?param1=value1¶m=value2
POST method
POST /microservice/v1/function HTTP/1.1
Host: localhost
param1=value1¶m=value2
How do we perform HTTP requests (postman and cli)
-
Postman https://web.postman.co/home
-
curlorwgetin the command line
How do we perform HTTP requests (python)
requestslibrary in python:
>> r = requests.get('https://api.github.com/user', auth=('user', 'pass'))
>> r.status_code
200
>> r.headers['content-type']
'application/json; charset=utf8'
>> r.encoding
'utf-8'
>> r.text
'{"type":"User"...'
>> r.json()
{'private_gists': 419, 'total_private_repos': 77, ...}
httpxlibrary in python https://www.python-httpx.org/quickstart/
Demo performing HTTP reqeusts httpx vs. curl
-
Perform GET https://httpbin.org/get
-
Perform POST
https://httpbin.org/postwithdata={'key': 'value'} -
Note that POST/GET could be "overloaded" (have the same endpoint)
How microservices talk to each other
What is a REST API?
"When a client request is made via a RESTful API, it transfers a representation of the state of the resource to the requester or endpoint. This information, or representation, is delivered in one of several formats via HTTP: JSON (Javascript Object Notation), HTML, XLT, Python, PHP, or plain text. JSON is the most generally popular file format to use because, despite its name, it’s language-agnostic, as well as readable by both humans and machines"
Read more about REST and HTTP
https://www.redhat.com/en/topics/api/what-is-a-rest-api
https://www.educative.io/blog/what-are-rest-apis
In class hands-on session (training for Ex1)
Please complete due next class (March 7th, 2022) and use Discord for help
-
Create a remote git repo on our organization GitHub https://github.com/EASS-HIT-2022/ (private/public)
-
Name the repo
http-api-demo-<your github name> -
Include a README, Dockerfile, client.py files
-
In client.py include at least two POST/GET requests from httpbin demo HTTP API (http://httpbin.org/):
- POST to any endpoint of your choice (e.g., http://httpbin.org/post)
-
GET to any endpoint of your choice (e.g., http://httpbin.org/get)
-
Make a Dockerfile that execute client.py on startup and prints the status and output from the http requests it performs from step 3. Helpful snippet:
FROM ubuntu
RUN  apt-get update
RUN  apt-get -y install python
CMD ["echo", "Hello, EASS 2022"]
- Now, create a second Dockerfile in your git repo
localhost.Dockerfilewhich call to the local hosted httpbin and call it via http://localhost:docker run -p 80:80 kennethreitz/httpbin - build the second docker image. Useful command:
docker build -t tab ./ -f localhost.Dockerfile
Hello World, FastAPI
Install
pip install fastapipip install "uvicorn[standard]"Uvicorn is an ASGI (Asynchronous Server Gateway Interface) web server implementation for Python
code of the server (main.py)
from fastapi import FastAPI

app = FastAPI()


@app.get("/")
async def get_root():
    return {"message": "Hello World", "method": "GET"}

@app.post("/")
async def post_root():
    return {"message": "Hello World", "method": "POST"}
Hello World, FastAPI
Running the server
uvicorn main:app --reload
read more
https://fastapi.tiangolo.com/tutorial/
Ex 1 (Due April 10, 2022)
- Build only the backend (using FastAPI)
- Include a Dockerfile, README and the source code of the app
- Be OOP-friendly (recall the SOLID principle) and use
pydantic - Include both integartion and unit tests inside using
pytest,httpx, orpip install docker(you may use some bash scripting as well). The idea is to be robust, simple and test the whole system wisely and efficently.
Suggested layout of the repo:
.
|- app
|             |- main.py
|             |- unit_tests.py
|             |- requirements.txt
|
|- integration_test.py
|- Dockerfile
|- README.md
List of ideas ideas for projects
- Building the backend of a voting app
- Personal wallet (keep expenses, images)
- Weather application
- The backend of a US/IL stock viewer analyzer webapp
- The backend of a twitter summarizer webapp (focus on one field e.g., stock symbols)
Handling Data/Models over the wire
We want to send data (JSONs) over the wire, but in the code we would like to work with objects.
-
DTO (Data Transfer Object)
-
ORM (Object Relational Mapping)
-
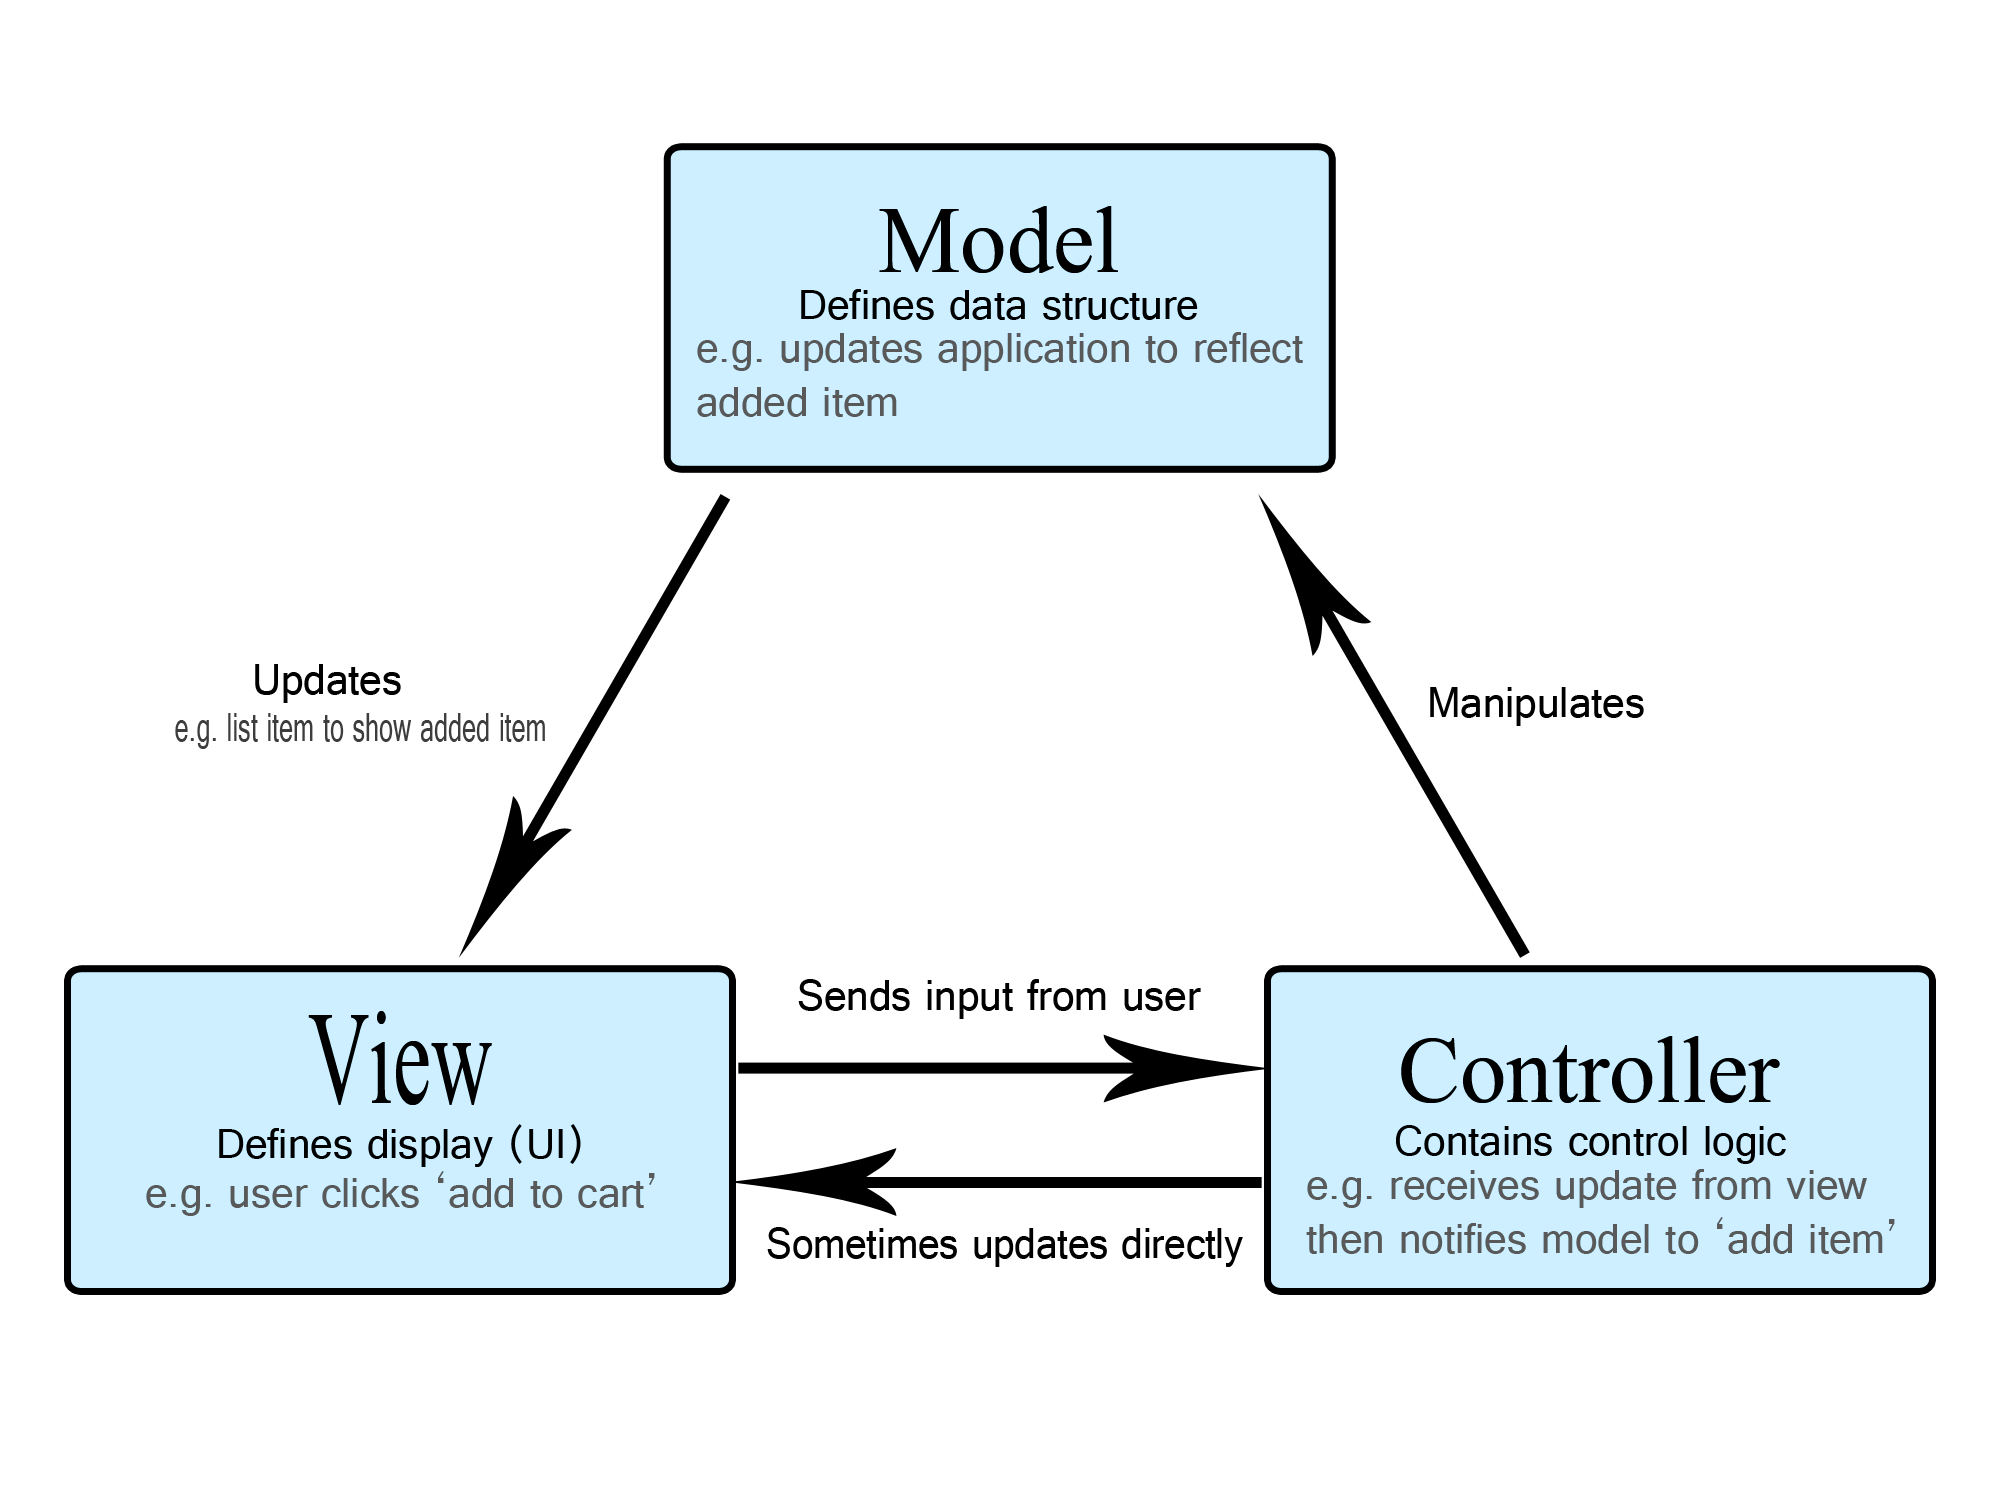
MVC (Model View Controller)
The MVC design pattern (mostly related to UI)
- Model The model manages the data, logic and rules of the application.
- View Any representation of information such as a chart, diagram or table.
- Controller Accepts input and converts it to commands for the model or view.
 { width=200px }
ref (Mozilla is great for web resources) https://developer.mozilla.org/en-US/docs/Glossary/MVC/model-view-controller-light-blue.png
Pydantic
pydantic helps us to define what type of JSONs are valid and what are their interperation. With Pydantic's Model classes we can define the input/outputs of each API endpoint. It helps fastapi with validation, serialization, and documentation.
- Between microservices (
requestvs.response) - Between Databases microservices
- Or between any two entities or the user and the application
from pydantic import BaseModel

class User(BaseModel):
    id: int
    name = 'Jane Doe'
Pydantic
from pydantic import BaseModel

class Client(BaseModel):
    id: int
    balance: float

class Transaction(BaseModel):
    from_client: Client
    to_client: Client
    amount: float

class Request(BaseModel):
    id: int
    transaction: Transaction

class Response(Request):
    approved: bool
    executed: bool
Accesing the data
@app.post("/v1/handle")
def handle(req: Request):
  if req.from_client.balance > req.transaction.amount:
    pass # do something

  res = Response()

  res.id = req.id
  return res
Using dataclasses, understanding what's pydantic is doing
from pydantic.dataclasses import dataclass
import json

@dataclass
class User:
  id: int
  name: str

user = User(id=123, name="James")
d = asdict(user)  # {'id': 123, 'name': 'James'
user_json = json.dumps(d)
print(user_json)  # '{"id": 123, "name": "James"}'

# Or directly with pydantic_encoder
json.dumps(user, default=pydantic_encoder)

json_raw = '{"id": 123, "name": "James"}'
user_dict = json.loads(json_raw)
user = User(**user_dict)

user = User.__pydantic_model__.parse_raw('{"id": 123, "name": "James"}')
print(user)
ref:
https://stackoverflow.com/questions/67621046/initializing-a-pydantic-dataclass-from-json
How to design a project
- architecture
- draw.io
 {width=250px}
Step 1: Outline use cases, constraints, and assumptions
Gather requirements and scope the problem. Ask questions to clarify use cases and constraints. Discuss assumptions.
- Who is going to use it?
- How are they going to use it?
- How many users are there?
- What does the system do?
- What are the inputs and outputs of the system?
- How much data do we expect to handle?
- How many requests per second do we expect?
- What is the expected read to write ratio?
ref
https://github.com/donnemartin/system-design-primer
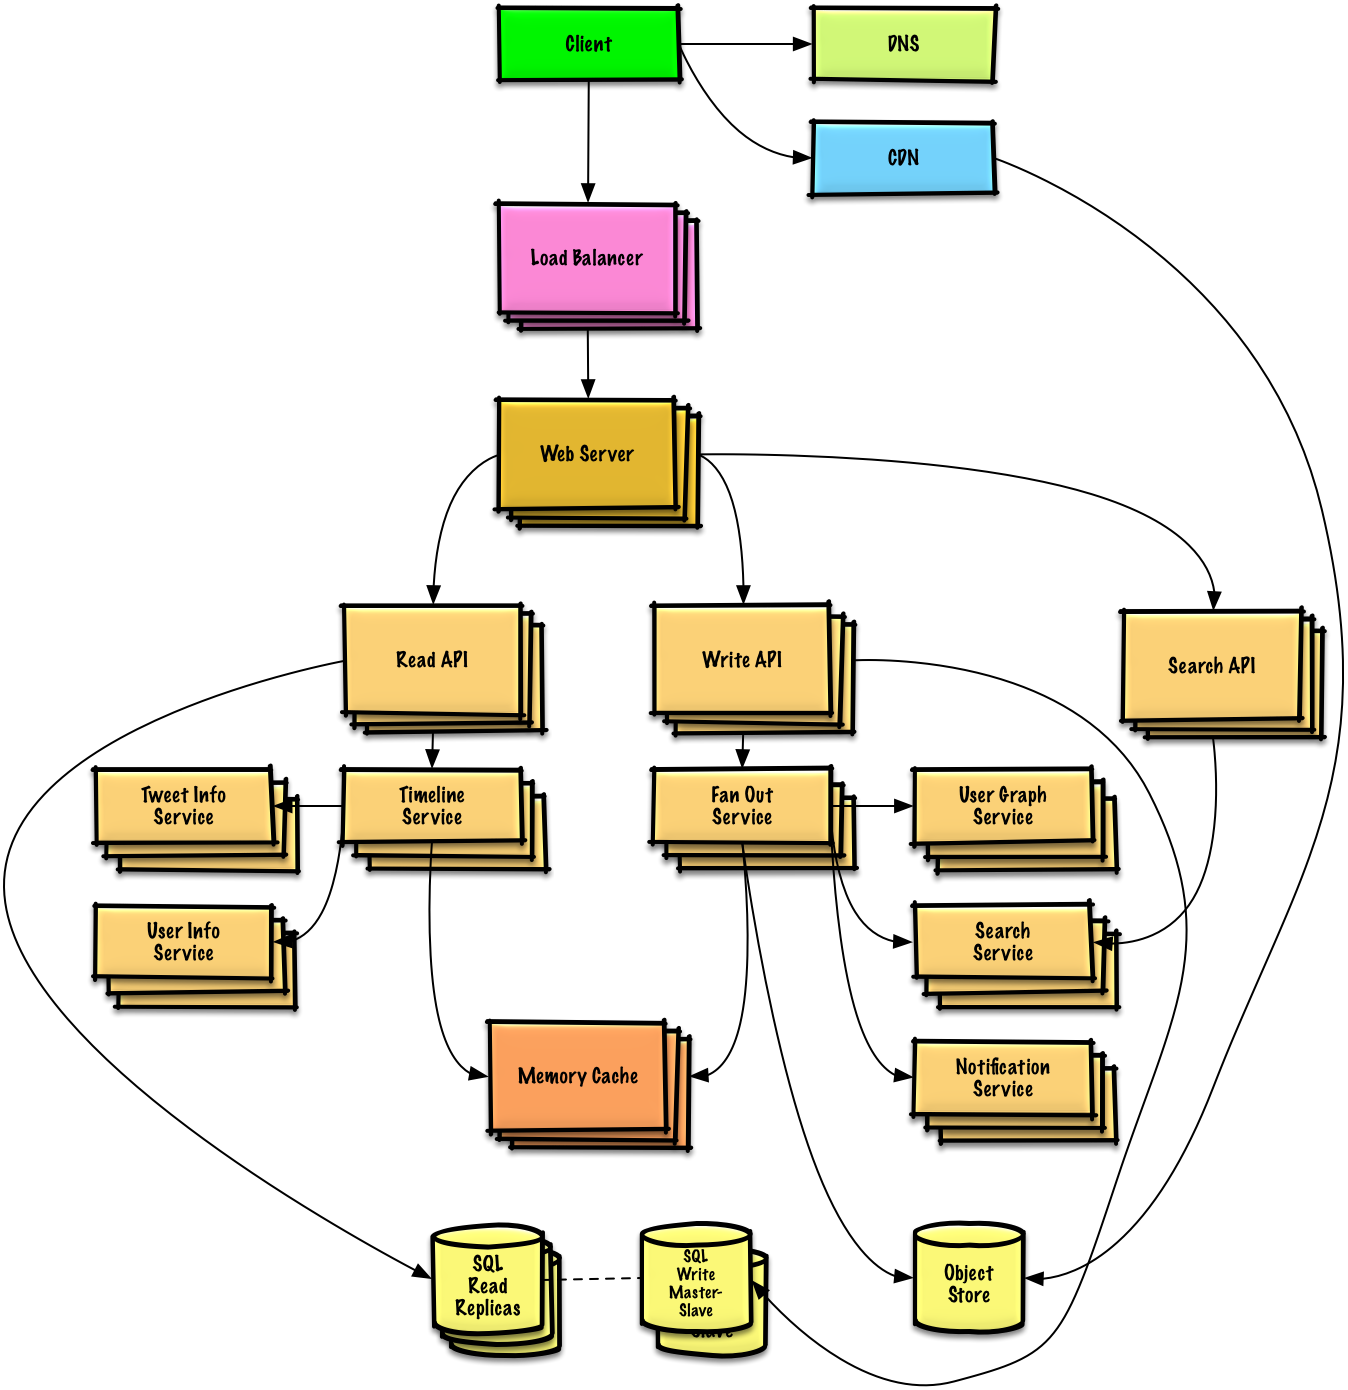
Step 2: Create a high level design
- Outline a high level design with all important components.
- Sketch the main components and connections
- Justify your ideas
How to use draw.io: https://reneelin2019.medium.com/drawing-cloud-architectures-neural-network-diagrams-and-more-with-draw-io-4f7128ee1aea
Step 3: Design core components
Dive into details for each core component. For example, if you were asked to design a url shortening service, discuss:
- Generating and storing a hash of the full url
- MD5 and Base62
- Hash collisions
- SQL or NoSQL
- Database schema
- Translating a hashed url to the full url
- Database lookup
- API and object-oriented design between the microservices
ref
https://github.com/donnemartin/system-design-primer
Step 4: Scale the design
Identify and address bottlenecks, given the constraints. For example, do you need the following to address scalability issues?
- Load balancer
- Horizontal scaling
- Caching
- Database sharding (breaking the rows or columns of a large table into multiple smaller tables)
- Blue-green deployment to reduce downtime and risk
- Discuss potential solutions and trade-offs. Everything is a trade-off. Address bottlenecks using principles of scalable system design.
Tips
- Use back of the envelope calculations
- Powers of two table
Power           Exact Value         Approx Value        Bytes
---------------------------------------------------------------
7                             128
8                             256
10                           1024   1 thousand           1 KB
16                         65,536                       64 KB
20                      1,048,576   1 million            1 MB
30                  1,073,741,824   1 billion            1 GB
32                  4,294,967,296                        4 GB
40              1,099,511,627,776   1 trillion           1 TB
Tips
- Latency numbers every programmer should know
Latency Comparison Numbers
--------------------------
L1 cache reference                    0.5 ns
Branch mispredict                       5 ns
L2 cache reference                      7 ns   14x L1 cache
Mutex lock/unlock                      25 ns
Main memory reference                 100 ns   20x L2 cache, 200x L1 cache
Compress 1K bytes with Zippy           10 us
Send 1 KB bytes over 1 Gbps network    10 us
Read 4 KB randomly from SSD*          150 us  ~1GB/sec SSD
Read 1 MB sequentially from memory    250 us
Round trip within same datacenter     500 us
Read 1 MB sequentially from SSD*        1 ms  ~1GB/sec SSD, 4X memory
HDD seek                               10 ms   20x datacenter roundtrip
Read 1 MB sequentially from 1 Gbps     10 ms   40x memory, 10X SSD
Read 1 MB sequentially from HDD        30 ms   120x memory, 30X SSD
Send packet CA->Israel->CA            200 ms
ref
https://github.com/donnemartin/system-design-primer
How would you implement google search engine (discussion)
https://softwareengineering.stackexchange.com/questions/38324/how-would-you-implement-google-search
Testing and Profiling
Testing
- SW testing is the process of evaluating and verifying that a software product or application does what it is supposed to do.
- Integration testing
- Unit testing
Profiling
- Flat profiler - computes the average call times (callers & callees)
- Call-graph profiler - shows the call times, frequencies of the functions and their call graph
References
https://docs.python.org/3/library/profile.html
https://stackoverflow.com/questions/582336/how-can-you-profile-a-python-script
https://medium.com/@alaminopu.me/profiling-your-python-3-code-8c3f695e62da
https://pypi.org/project/pytest-benchmark/
https://www.ibm.com/topics/software-testing
pytest
Unit tests are written and run by software developers to ensure that a section of an application ("unit") meets its design and behaves as intended.
installing
pip install pytest
hello world
# content of test_sample.py
def inc(x):
    return x + 1

def test_pos():
    assert inc(3) == 5

def test_neg():
    assert inc(-1) == 0
References
https://realpython.com/pytest-python-testing/ https://docs.pytest.org/en/7.1.x/
profiling code via testing
profiling ("program profiling", "software profiling") is a form of dynamic program analysis that measures, for example, the space (memory) or time complexity of a program, the usage of particular instructions, or the frequency and duration of function calls. Most commonly, profiling information serves to aid program optimization, and more specifically, performance engineering.
import cProfile

def fibonnaci(n):
    if n in [0, 1]:
        return n
    else:
        return fibonnaci(n-1) + fibonnaci(n-2)

if __name__ == '__main__':
  pr = cProfile.Profile()
  pr.enable()
  fibonnaci(100)
  pr.disable()
  pr.print_stats()
profiling code
$ pip install pytest-benchmark
$ pip install aspectlib
import time
import pytest
class Foo(object):
  def __init__(self, arg=0.01):
    self.arg = arg

  def run(self):
    self.internal(self.arg)

  def internal(self, duration):
    time.sleep(duration)

def test_foo(benchmark):
  benchmark.weave(Foo.internal, lazy=True)
  f = Foo()
  f.run()
$ py.test test_file.py
profiling code
import time
import pytest

@pytest.mark.benchmark(
  group="group-name",
  min_time=0.1,
  max_time=0.5,
  min_rounds=5,
  timer=time.time,
  disable_gc=True,
  warmup=False
)
def test_my_stuff(benchmark):
  @benchmark
  def result():
    # Code to be measured
    return time.sleep(0.001)

  # Extra code, to verify that the run
  # completed correctly.
  # Note: this code is not measured.
  assert result is None
$ py.test test_file.py
pytest fastapi (https://www.fastapitutorial.com/blog/unit-testing-in-fastapi/)
# content of main.py
from fastapi import FastAPI

app = FastAPI()

@app.get("/")
async def read_main():
  return {"msg": "Hello World"}
# content of test_main.py
from fastapi import FastAPI
from fastapi.testclient import TestClient

app = FastAPI()

@app.get("/")
async def read_main():
  return {"msg": "Hello World"}

client = TestClient(app)

def test_read_main():
  response = client.get("/")
  assert response.status_code == 200
  assert response.json() == {"msg": "Hello World"}
Linting/Formatting your source code
$ pip install black
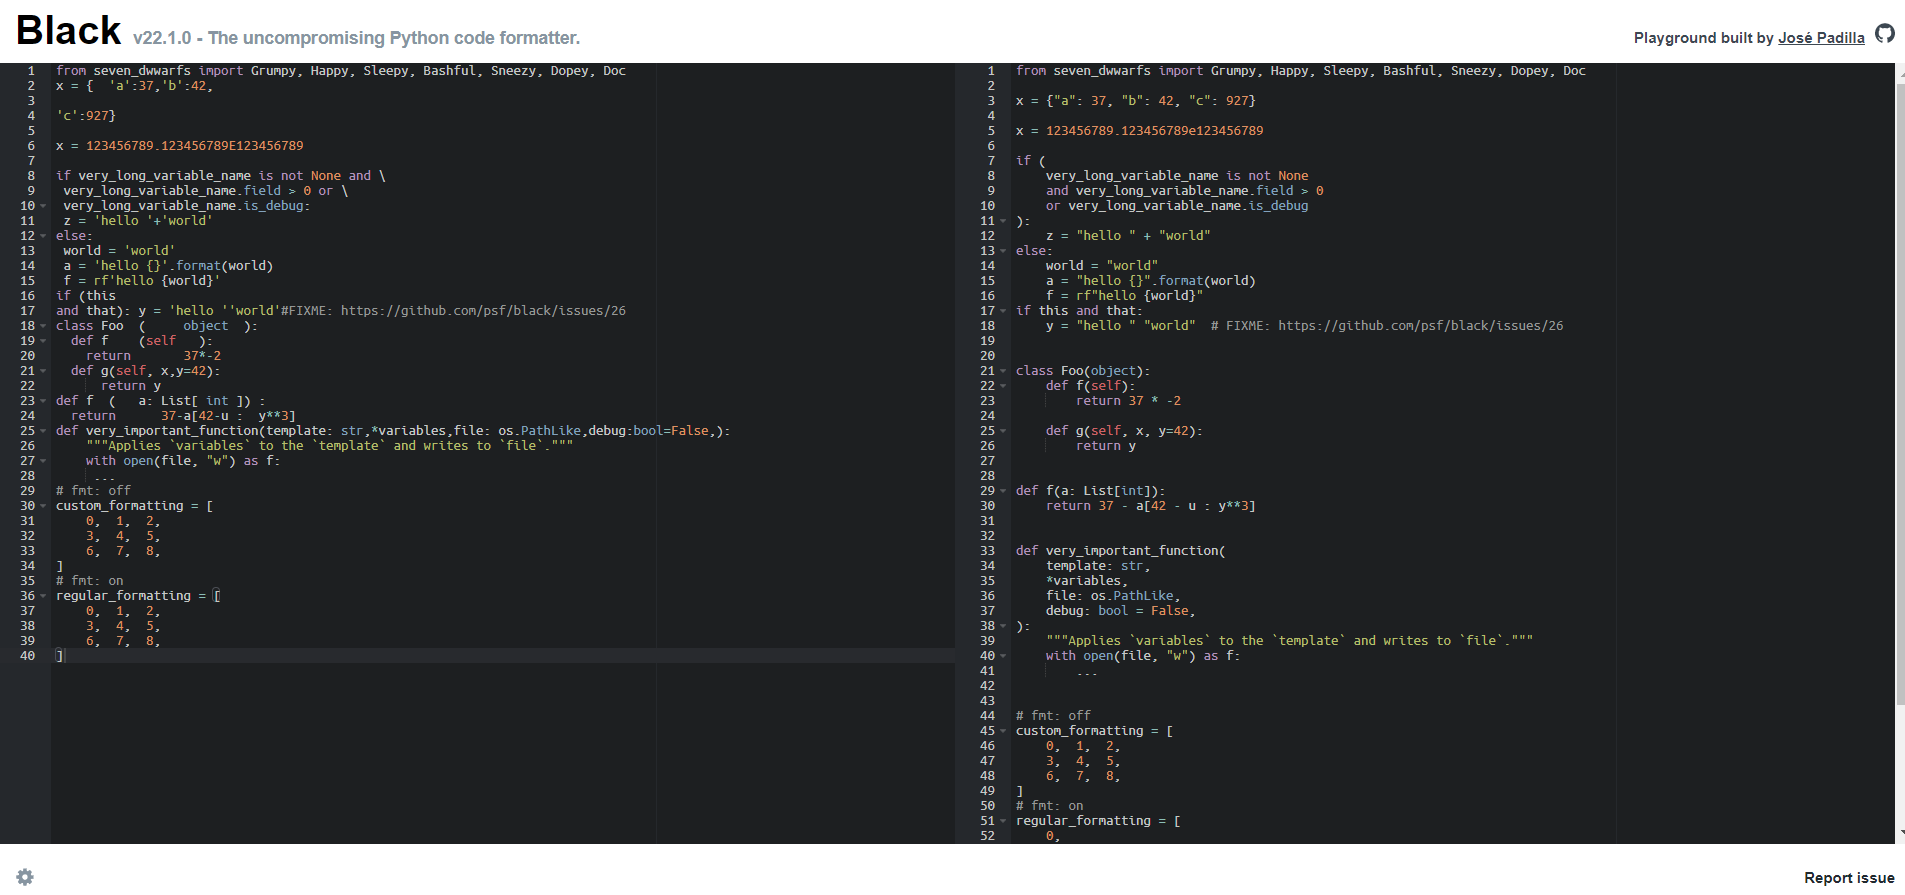 { width=420px }
https://black.vercel.app/?version=stable
Midterm survey, touchbase, pep talk, and review
- Survey
- Touchbase/pep-talk
- Review of fundamental technical material
(recap CLI, docker, Dockerfile, HTTP, GET/POST,
docker exec,docker ps,docker network, how to use vim, visual studio code, git and github,CMD,CP,WORKDIR,RUN, execute bash scripts/complex logic inside a dockerfile) - Review of SW development principles: early testing, github, README, arch diagram, name the services
Doing same thing in different ways (redis client-server)
# running redis DB container
$ docker run --rm --name redis-container -d redis
7ea29d853d72749870851cbc677664a3d252aafd2c16f79d7823a7f75167bcf9
# running the client CLI
$ docker run -it --name redis-cli --link redis-container:redis  \
  --rm redis redis-cli -h red
is -p 6379
redis:6379> HELLO
 1) "server"
 2) "redis"
 3) "version"
 4) "6.2.6"
 5) "proto"
 6) (integer) 2
 7) "id"
 8) (integer) 3
 9) "mode"
10) "standalone"
11) "role"
12) "master"
13) "modules"
14) (empty array)
redis:6379> ping
PONG
redis:6379> ping [hello]
"[hello]"
redis:6379> ping [hello-eass-2022]
"[hello-eass-2022]"
redis:6379>
second way
$ docker run --rm --name redis-container -p1234:6379 -d redis
6c318087da94fc1b863cd4093affc2a0a773f5dcb42764865e9d8b13e03790db
$ python
Python 3.9.5 (default, Jun  4 2021, 12:28:51)
[GCC 7.5.0] :: Anaconda, Inc. on linux
Type "help", "copyright", "credits" or "license" for more information.
>>> import redis
>>> r = redis.Redis(host='localhost', port=1234, db=0)
>>> r.set('foo', 'bar')
True
>>> r.get('foo')
b'bar'
third way
$ docker run --rm --name redis-container -p1234:6379 -d redis
$ docker network create --subnet 172.20.0.0/16 \
  --ip-range 172.20.240.0/20 redis-demo-network
$ docker network connect --ip=172.20.0.1 redis-demo-network redis-container
$ docker run -it --network redis-demo-network --rm python:3.9 bash

# INSIDE THE CONTIANER
root@e2a2e4951955:/# pip install redis

# start python cli inside client container
root@e2a2e4951955:/# python
>>> import redis
>>>  r = redis.Redis(host='172.20.0.1', port=6379, db=0)
>>> r.set('foo', 'bar')
True
>>> r.get('foo')
b'bar'
GitHub's copilot by openai demo
 { width=400px }
Where are we going from now
- UI: streamlit, javascript, react
- Docker compose
- Databases: redis, mongodb, mysql
- Basic security, authentication
- Advanced SW concepts: functional programming
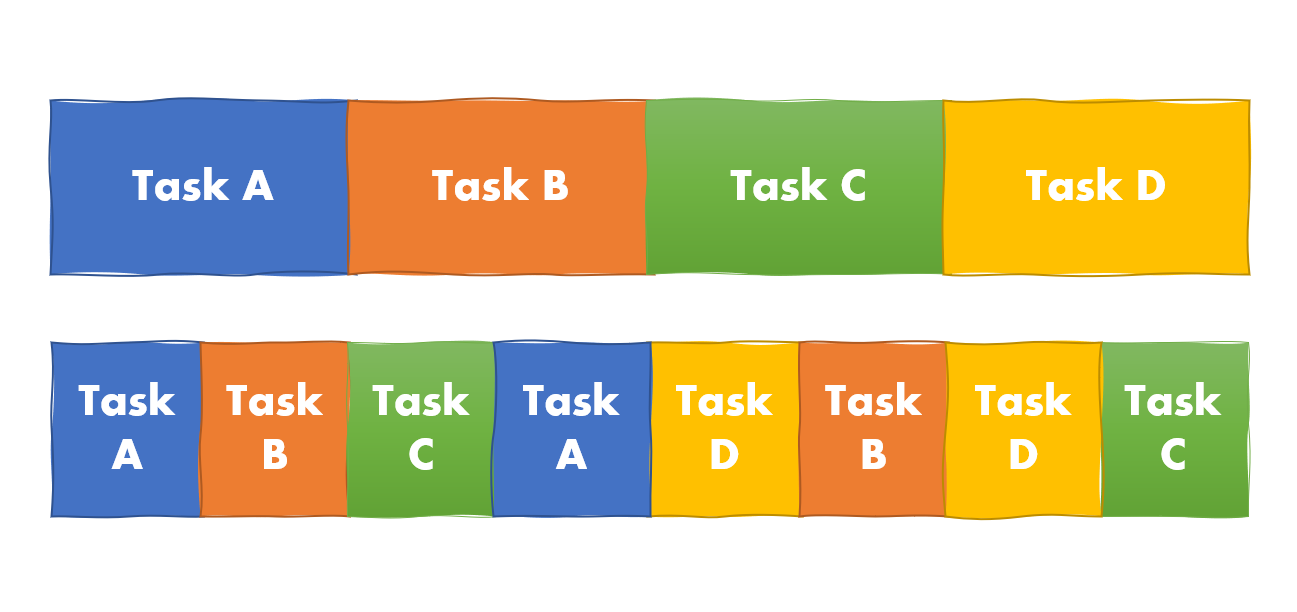
Python Async IO
How does something which feels concurrent uses a single thread and a single CPU?
 { width=200px }
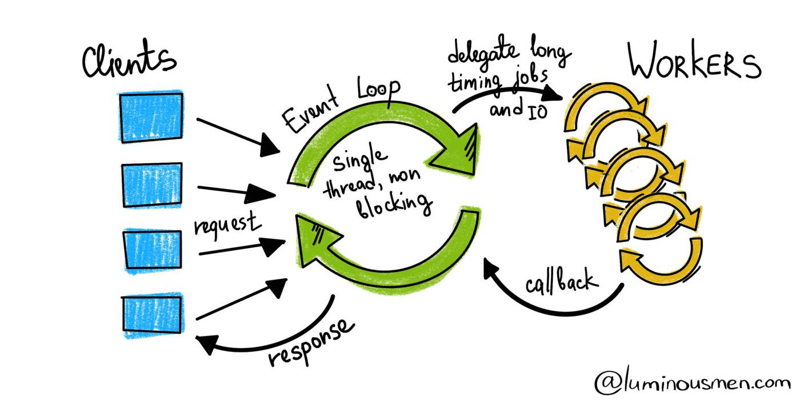
Event loop
 { width=200px }
References
https://tenthousandmeters.com/blog/python-behind-the-scenes-12-how-asyncawait-works-in-python/
Multithreading, Processes, Asyncio
import threading
import concurrent.futures
import time
from tqdm.asyncio import trange, tqdm
import asyncio
import numpy as np


def run_threading(n_threads=5):
    threads = []
    print("Starting...")
    start = time.time()
    for i in range(n_threads):
        thread = threading.Thread(target=print, args=[f"I am thread {i}."])
        thread.start()
        threads.append(thread)

    for thread in threads:
        thread.join()
    end = time.time()
    print(f"Time to complete: {end - start}")
Multithreading, Processes, Asyncio
import threading
import concurrent.futures
import time
from tqdm.asyncio import trange, tqdm
import asyncio
import numpy as np


def do_concurrent(n=32):
    start = 10_000_000
    print_list = [i for i in range(start, start + n)]
    print("Starting...")
    start = time.time()
    with concurrent.futures.ProcessPoolExecutor(max_workers=2) as executor:
        futures = {executor.submit(print, i): i for i in print_list}
    for f in concurrent.futures.as_completed(futures):
        print(f"done {futures[f]} {f.result()}")
    end = time.time()
    print(f"Time to complete: {end - start}")
Multithreading, Processes, Asyncio
import threading
import concurrent.futures
import time
from tqdm.asyncio import trange, tqdm
import asyncio
import numpy as np


async def wait_and_print(t, n):
    await asyncio.sleep(t)
    print(f"coroutine {n} slept for {t} seconds")


async def do_tqdm_asyncio(n=10):
    arr = []
    async for i in trange(n):
        print(f"asyncio {i}")
        arr.append(wait_and_print(np.random.randint(1, 5), i))
    await asyncio.gather(*arr)

if __name__ == "__main__":
    run_threading(100)
    do_concurrent(100)
    asyncio.run(do_tqdm_asyncio(100))
The core behind asyncio are select and poll OS syscalls
import selectors
import socket

sel = selectors.DefaultSelector()

def accept(sock, mask):
    conn, addr = sock.accept()  # Should be ready
    print('accepted', conn, 'from', addr)
    conn.setblocking(False)
    sel.register(conn, selectors.EVENT_READ, read)

def read(conn, mask):
    data = conn.recv(1000)  # Should be ready
    if data:
        print('echoing', repr(data), 'to', conn)
        conn.send(data)  # Hope it won't block
    else:
        print('closing', conn)
        sel.unregister(conn)
        conn.close()
The core behind asyncio are select and poll OS syscalls
import selectors
import socket

sock = socket.socket()
sock.bind(('localhost', 1234))
sock.listen(100)
sock.setblocking(False)
sel.register(sock, selectors.EVENT_READ, accept)

while True:
    events = sel.select()
    for key, mask in events:
        callback = key.data
        callback(key.fileobj, mask)
References
https://docs.python.org/3/library/selectors.html#module-selectors
Classes in python
What is a Class? A class is simply a template for creating objects. Objects are an encapsulation of data (variables) and functionality (methods). A class defines the kind of object that will be created. For example, we can use thebuilt-in list type as a class to create lists of various types:
>>> lst = list()    # Create an empty list object
>>> lst = list([1,2,3])  # Create a list with initial values
In both cases above, we are creating objects of type "list". The first line creates an empty list while the second line creates a list with initial values 1, 2, 3. We can also create our own customized classes to create various objects as we will see in later sections.
Creating Classes
In Python, a class is created by the keyword:class followed by the name of the class. The following code creates a simpleclass named MyClass:
class MyClass:      # Define MyClass
    pass            # Pass means do nothing for now

                    # We'll add features later
Creating Instances/Objects from Classes
An instance is an object that contains all the variables and methods defined by itsclass. Tocreate an instance from a class, we simply use theclass name followed by parenthesis (). For example:
 my_instance = MyClass()       # Create an instance of MyClass

                             # This calls MyClass __init__ method

 print(my_instance)          # Print memory address of my_instance

                             # __repr__ method is called automatically
Python OOP
Python is an object-oriented language. This means that everything in Python is an object, and objects can interact with each other. Classes are a way of grouping together similar objects. For example, you could have a class of animals, which contains individual animals like lions, tigers, and bears. Each animal would have its own set of attributes (like size, weight, and fur color) and methods (like how to hunt or what to eat). OOP lets you structure your code in a way that makes it easy to reuse and extend. So if you wanted to create a new type of animal, you could just create a new class that inherits from the original animal class. This would give the new animal all the same attributes and methods as the original, but you could also add new ones or override existing ones.
Python OOP
Here's a simple example of a class:
class Animal:
    def __init__(self, name, weight):
        self.name = name
        self.weight = weight

    def eat(self):
        print("%s is eating." % self.name)

    def make_sound(self):
        print("%s is making a sound." % self.name)

class Dog(Animal):
    def __init__(self, name, weight, size)
      self._size = size
      super().__init__(name, weight)

    def make_sound(self):
        print("Barking")
Encoding binary data (meaning encoding anything)
Base64 is a binary-to-text encoding scheme that represents binary data in an ASCII string format by translating it into a base-64 representation. This conversion allows for easy transport of binary data through systems that only support safe text characters.
Python provides a base64 encoding module that can be used to encode and decode Base64 strings.
>>> import base64
>>> encoded_string = base64.b64encode(b'binary\x00string')
'YmluYXJ5AHN0cmluZw=='
>>> decoded_bytes = base64.b64decode(encoded_string)
b'binary\x00string'
General idea, example of image
To encode an image using base64, the image file must first be read into a bytestring.
with open('image.png', 'rb') as f:
    data = f.read()
Next, the base64.b64encode() function can be used to encode the bytestring:
encoded_data = base64.b64encode(data)
To decode the encoded string, the base64.b64decode() function can be used:
decoded_data = base64.b64decode(encoded_data)
Finally, the decoded data can be written back to an image file using the open() function:
with open('image_copy.png', 'wb') as f:  # note the 'wb' mode!
    f.write(decoded_data)
Using FileResponse
from fastapi.responses import FileResponse
u="https://upload.wikimedia.org/wikipedia/en/2/2c/Holon_Institute_of_Technology_logo.jpg"
@app.get("/v1/get-hit-image")
async def main():
    return FileResponse(u)
binary/images using base64 (better option with BytesIO)
$ pip install imageio
import imageio as iio
import io, base64
u="https://upload.wikimedia.org/wikipedia/en/2/2c/Holon_Institute_of_Technology_logo.jpg"

image = iio.imread(u)
byte_stream = io.BytesIO()
iio.v3.imwrite(byte_stream, image, plugin="pillow", format="PNG")
encoded = base64.b64encode(byte_stream.getbuffer().tobytes())
byte_stream.getbuffer().tobytes() == base64.b64decode(encoded)
May try with local images as well
import base64
import io
from imageio import imread
import matplotlib.pyplot as plt

filename = "yourfile.jpg"
with open(filename, "rb") as fid:
    data = fid.read()

b64_bytes = base64.b64encode(data)
b64_string = b64_bytes.decode()

# reconstruct image as an numpy array
img = imread(io.BytesIO(base64.b64decode(b64_string)))

# show image
plt.figure()
plt.imshow(img, cmap="gray")
plt.show()
Advanced concepts in python
Advanced concepts in Python can include anything from functional programming to working with databases. In this tutorial, we'll focus on a few key advanced concepts that are particularly useful in Python programming. First, let's talk about decorators. Decorators are a way to "wrap" a function so that it behaves differently than it would without the decorator. For example, you might use a decorator to log every time a function is called, or to cache the results of a function so that future calls are faster. Next, we'll talk about generators. Generators are a type of iterator that allows you to write code that lazily generates values, instead of having to compute all the values at once. This can be useful for working with large data sets where you don't want to hold everything in memory at once.
Finally, we'll talk about context managers. Context managers allow you to specify what should happen when you enter and exit a particular block of code (for example, opening and closing a file). This can be handy for making sure your code Cleanup up after itself, or for ensuring that resources are always properly released.
Decorators
Decorators in Python
Python decorators are a powerful tool for modifying functions and classes. Decorators can be used to add or remove functionality from a function or class, making them ideal for customizing code without having to modify the underlying code itself.
In Python, decorators are typically defined as functions that take a single argument (the object to be decorated) and return the modified object. For example, here is a simple decorator that adds logging to a function:
def log_function(func):
   def wrapper(*args, **kwargs):
       print('Calling {0} with args {1} and kwargs {2}'
            .format(func.__name__, args, kwargs))
       return func(*args, **kwargs)
   return wrapper


@log_function  #this is how you would "decorate" a function with the log_function decorator
def some_function(arg1, arg2):  #some_function is now a wrapped function with logging capabilities
    print('Inside some_function')


some_function(1, 2)  #Will print: "Calling some_function with args (1, 2) and kwargs {}" followed by "Inside some_function"
Decorators can also be applied to classes in a similar way
class my_decorator(object):
  def __init__(self, func):
    self.func = func
  def __call__(self, *args):
    print("before function call")
    ret = self.func(*args)
    print("after function call")
    return ret


@my_decorator
def simple_function():
  print("inside simple_function")

# equivalent to simple_function = my_decorator(simple_function)
>>> simple_function()
before function call
inside simple_function
after function call
Generators
Generators are a special type of function that allow us to create iterators. They're similar to list comprehensions, but they don't actually construct a list; instead, they return an iterator object that can be used to access the values in the sequence one at a time.
def my_range(start, end):
    while start < end:
        yield start
        start += 1

for i in my_range(0, 5):
    print(i)
Sqlite inside python3 (not via microservice)
For our use cases it is better to work with extenral DB microservices with persistent storage (volumes on host via Docker)
import sqlite3
conn = sqlite3.connect('mydatabase.db')

# Create a table called "users" with three columns: id, name and email:
conn.execute('''CREATE TABLE users
       (id INTEGER PRIMARY KEY AUTOINCREMENT,
       name TEXT NOT NULL,
       email TEXT NOT NULL);''')

# Insert two rows of data:
conn.execute("""INSERT INTO users (name,email)
  VALUES ('John', 'john@example.com');""")
conn.execute("""INSERT INTO users (name,email)
  VALUES ('Mary', 'mary@example.com');""")

# Save the changes and close the connection:
conn.commit()
conn.close()
Retrieving the data from the sqlite DB
>>> cursor = conn.cursor()
>>> cursor.execute("select * from users")
>>> results = cursor.fetchall()
>>> print(results)
[(1, 'John', 'john@example.com'), (2, 'Mary', 'mary@example.com')]
Python modules and packages
Python packages and modules are a great way to organize your code and share it with others. Packages are collections of modules, and modules are Python files with a .py extension. You can easily create and distribute your own Python packages and modules.
Creating a Package
To create a package, simply create a directory with the name of your package. Then, inside that directory, create a __init__.py file. This file can be empty, but it must exist in order for Python to recognize the directory as a package.
Now that you have a package, you can start adding modules to it. To add a module to your package, simply create a new Python file with a .py extension and place it inside the package directory.
Distributing Your Package
If you want to share your package with others, you can upload it to the Python Package Index (PyPI). PyPI is the official repository for third-party Python software. Once your package is on PyPI, others can install it using pip, the official tool for installing Python packages:
pip install YOUR-PACKAGE-NAME
Writing a Python package is fairly simple. All you need is a directory structure that matches the package name, and __init__.py files in each subdirectory. The __init__.py files tell Python what modules are in each subpackage, and usually contain initialization code for those modules. Here's an example directory structure for a package named "mypackage":
mypackage/
 - __init__.py
 - module1.py
 - module2.py
Each __init__ .py file contains the following code:
from module1 import *
from module2 import *
Another example
# mypackage/
__init__.py
a.py
b.py
c.py

# mypackage/__init__.py
from .a import A  # noqa
from .b import B  # noqa
from .c import C  # noqa

# a.py
CONST=123
Another example
Create a new file called mymodule.py in your project directory with the following contents:
def greeting(name):
  print("Hello, " + name + "!")
Then, create a new file called "main.py" in the same directory with the following contents:
import mymodule
import mypackage
mymodule.greeting("World")
Context manager
Python Context managers are a way to control the environment in which a piece of code is executed. They are typically used to manage resources such as files or database connections.
A context manager is a class that defines two special methods, __enter__() and __exit__(). The code that is wrapped in a with statement is executed within the context of the __enter__() method. After the code has been executed, the __exit__() method is called to clean up any resources that were used.
Here is a simple example of a context manager:
class FileManager:
    def __init__(self, filename):
        self.filename = filename

    def __enter__(self):
        self.file = open(self.filename)
        return self.file

    def __exit__(self, type, value, traceback):
        self.file.close()
With this context manager, we can use the with statement to automatically open and close files:
with FileManager('sample.txt') as f:
    for line in f:
        print(line)
Functional programming
Functional programming is a style of programming where we try to make our code more like a mathematical function. That is, we write our code in such a way that it can be easily composed with other code, without worrying about side effects (like mutating data). In Python, we can achieve this by writing our code using higher-order functions and lambdas. Higher-order functions are functions that take other functions as input or return a function as output. Lambdas are anonymous functions that can be passed as arguments to other functions. Say we have a list of numbers and we want to square each number in the list. In imperative style, we would write something like this:
numbers = [1, 2, 3, 4]
squared_numbers = []
for n in numbers:
    squared_numbers.append(n**2)
print(squared_numbers)
Functional programming
But notice how much boilerplate code there is just to perform a simple operation! We have to initialize an empty list, loop over the numbers list, and append each squared number to the new list.
In functional style, we can achieve the same thing with much less code:
numbers = [1, 2, 3, 4]
squared_numbers = map(lambda x: x**2 , numbers)
print(list(squared_numbers))
All we're doing here is passing a lambda function (which squares its input) to the map function. The map function applies the lambda function to every element in the input list and returns an iterator over the results. Finally ,we convert the iterator into a list so that we can print it out.
Pandas
Pandas is a powerful Python data analysis toolkit. It provides a high-performance DataFrame object that can be used to manipulate and analyze data. Pandas also offers a wide variety of statistical and machine learning algorithms that can be applied to data.
In this tutorial, we will cover the basics of pandas, including how to create a DataFrame, how to select data, and how to apply some basic statistical methods. We will also show how to use pandas to load and save data from various sources.
import numpy as np
import pandas as pd

s = pd.Series([1, 3, 5, np.nan, 6, 8])

dates = pd.date_range("20130101", periods=6)

df = pd.DataFrame(np.random.randn(6, 4), index=dates, columns=list("ABCD"))
Pandas
df = pd.DataFrame(
    {
        "A": 1.0,
        "B": pd.Timestamp("20130102"),
        "C": pd.Series(1, index=list(range(4)), dtype="float32"),
        "D": np.array([3] * 4, dtype="int32"),
        "E": pd.Categorical(["test", "train", "test", "train"]),
        "F": "foo",
    }
)

df2.dtypes
df2.<TAB>
Pandas
df.head()
df.tail(3)
df.index
df.columns
df.to_numpy()
df.describe()
df.T
df.sort_index(axis=1, ascending=False)
df.sort_values(by="B")
df["A"]
df[0:3]
df["20130102":"20130104"]
df.loc[:, ["A", "B"]]
df.iloc[3]
df.iloc[[1, 2, 4], [0, 2]]
df[df["A"] > 0]
df.mean(1)
df.apply(np.cumsum)
Pandas
left = pd.DataFrame({"key": ["foo", "foo"], "lval": [1, 2]})
right = pd.DataFrame({"key": ["foo", "foo"], "rval": [4, 5]})

pd.merge(left, right, on="key")


df = pd.DataFrame(
    {
        "A": ["foo", "bar", "foo", "bar", "foo", "bar", "foo", "foo"],
        "B": ["one", "one", "two", "three", "two", "two", "one", "three"],
        "C": np.random.randn(8),
        "D": np.random.randn(8),
    }
)

df.groupby("A").sum()
ref
https://pandas.pydata.org/docs/user_guide/10min.html
Ex 2 (Due May 30, 2022)
- Dockerfile for Frontend
- Include in README.md how to run the Backend and Frontend so they can communicate over HTTP (make sure they are connected on the same Docker network)
- Short demo with a movie (Windows Key+G or QuickTime)
Suggested layout of the repo:
.
|- app/frontend
|             |- main.py
|             |- unit_tests.py
|             |- requirements.txt
|             |- Dockerfile
|- app/backend dir (Ex1)
|- integration_test.py
|- README.md
Ex 3 (Due June 19, 2022)
- Docker compose
- At least 3 microservices
- Short demo with a movie (Windows Key+G or QuickTime)
Suggested layout of the repo:
.
|- app/backend dir (Ex1)
|- app/frontend dir (Ex2)
|- integration_test.py
|- docker-compose.yml
|- README.md
docker-compose (example)
$ mkdir composetest
$ cd composetest
docker-compose (example)
import time

import redis
from fastapi import FastAPI

app = FastAPI()
cache = redis.Redis(host='redis', port=6379)

def get_hit_count():
    retries = 5
    while True:
        try:
            return cache.incr('hits')
        except redis.exceptions.ConnectionError as exc:
            if retries == 0:
                raise exc
            retries -= 1
            time.sleep(0.5)

@app.get('/')
def hello():
    count = get_hit_count()
    return 'Hello World! I have been seen {} times.\n'.format(count)
docker-compose (example)
FROM tiangolo/uvicorn-gunicorn:python3.8

RUN pip install redis
COPY main.py /app
ref
https://docs.docker.com/compose/gettingstarted/
docker-compose (example)
docker-compose.yml
version: "3.9"
services:
  web:
    build: .
    ports:
      - "8000:80"
  redis:
    image: "redis:alpine"
$ docker-compose build
$ docker-compose up
docker-compose complex scenario (1/2)
version: "3"

services:
  python-fastapi:
    image: tiangolo/uvicorn-gunicorn-fastapi:python3.8
    restart: on-failure
    environment:
      PYTHONPATH: /app
    working_dir: /app
    command: uvicorn main:app --host 0.0.0.0 --port 80
    ports:
      - 80:80
  redis:
    image: redis:6.0.5-alpine
    restart: always
    ports:
      - 6379:6379
docker-compose complex scenario (2/2)
  mysql:
    image: mysql:5.7
    restart: always
    environment:
      MYSQL_ROOT_PASSWORD: root
      MYSQL_USER: user
      MYSQL_PASSWORD: password
      MYSQL_DATABASE: db
    ports:
      - 3306:3306
  rabbitmq:
    image: rabbitmq:3.8.2-management
    restart: always
    ports:
      - 5672:5672
      - 15672:15672
  streamlit:
    image: streamlit/streamlit:0.58.0
    command: streamlit run app.py --server.port 80
    ports:
      - 80:80
Streamlit
Streamlit is a powerful Python library that allows you to create beautiful interactive web applications with just a few lines of code. In this tutorial, we'll show you how to use Streamlit to build a simple web application that can be used to predict the price of a stock using machine learning.
We'll first need to install Streamlit and all of the dependencies required for this tutorial. You can do so by running the following command in your terminal:
$ pip install streamlit pandas numpy scikit-learn alpha-vantage plotly
hello world
import streamlit as st
st.title("Hello, Streamlit!")
st.write("Here's our first attempt at using Streamlit")
st.markdown("""
# Streamlit is **awesome**.

That's why we use it for all our projects.
""")

st.latex(r'''
     a + ar + a r^2 + a r^3 + \cdots + a r^{n-1} =
     \sum_{k=0}^{n-1} ar^k =
     a \left(\frac{1-r^{n}}{1-r}\right)
     ''')
refs
https://docs.streamlit.io/library/api-reference https://streamlit.io/gallery
Markdown cheat sheet (vscode can render)
- Write your README.md on GitHub
- Format text on your Frontend Streamlit app
https://stackedit.io/
https://www.markdownguide.org/cheat-sheet/
https://github.com/adam-p/markdown-here/wiki/Markdown-Cheatsheet
Write a data frame
import streamlit as st
import pandas as pd

st.write("Here's our first attempt at using data to create a table:")
st.write(pd.DataFrame({
    'first column': [1, 2, 3, 4],
    'second column': [10, 20, 30, 40]
}))
ref
https://docs.streamlit.io/library/get-started/main-concepts
Highlighting elements
import streamlit as st
import numpy as np
import pandas as pd

dataframe = pd.DataFrame(
    np.random.randn(10, 20),
    columns=('col %d' % i for i in range(20)))

st.dataframe(dataframe.style.highlight_max(axis=0))
ref
https://docs.streamlit.io/library/get-started/main-concepts
Draw a line chart
import streamlit as st
import numpy as np
import pandas as pd

dataframe = pd.DataFrame(
    np.random.randn(10, 20),
    columns=('col %d' % i for i in range(20)))

st.dataframe(dataframe.style.highlight_max(axis=0))
ref
https://docs.streamlit.io/library/get-started/main-concepts
Plot a map
import streamlit as st
import numpy as np
import pandas as pd

map_data = pd.DataFrame(
    np.random.randn(1000, 2) / [50, 50] + [37.76, -122.4],
    columns=['lat', 'lon'])

st.map(map_data)
ref
https://docs.streamlit.io/library/get-started/main-concepts
Widgets
import streamlit as st
x = st.slider('x') # this is the widget
st.write(x, 'squared is', x * x)
import streamlit as st
st.text_input("Your name", key="name")

# You can access the value at any point with:
st.session_state.name
ref
https://docs.streamlit.io/library/get-started/main-concepts
Layout
import streamlit as st

# Add a selectbox to the sidebar:
add_selectbox = st.sidebar.selectbox(
    'How would you like to be contacted?',
    ('Email', 'Home phone', 'Mobile phone')
)

# Add a slider to the sidebar:
add_slider = st.sidebar.slider(
    'Select a range of values',
    0.0, 100.0, (25.0, 75.0)
)
ref
https://docs.streamlit.io/library/get-started/main-concepts
How would you query your backend?
import streamlit as st
import httpx

backend_endpoint = "https://httpbin.org/get"
r = httpx.get(backend_endpoint)

st.json(r.json())
ref
https://docs.streamlit.io/library/get-started/main-concepts
Demo (Fintech App)
Get API key for stocks https://www.alphavantage.co/
import streamlit as st
import pandas as pd
import numpy as np
import plotly.figure_factory as ff

import pandas as pd
from alpha_vantage.timeseries import TimeSeries

# TJNG28SJ5PJN34YX
ts = TimeSeries(os.environ['ALPHAVANTAGE_API_KEY'], output_format='pandas')
df, meta_data = ts.get_daily(symbol='TSLA')

st.dataframe(df)


fig = ff.create_distplot(df.open.values())
st.plotly_chart(fig, use_container_width=True)
$ streamlit run app.py --server.port 8501
Dockerfile streamlit
FROM python:3.8
RUN pip install streamlit
COPY . /app
WORKDIR /app
ENTRYPOINT ["streamlit", "run", "app.py"]
Something new from Anaconda
Pyscript
https://github.com/pyscript/pyscript
Javascript
JavaScript is a programming language that can be used to add interactivity to websites. For example, you can use JavaScript to create drop-down menus, or to display the current date and time.
In order to use JavaScript on a web page, you must first embed the JavaScript code into the HTML code of the page. This can be done using the <script> tag.
For example, the following code would add a drop-down menu to a web page:
<html>
   <head>
      <title>Hello World</title>
      <script>
         alert("Do not use alerts! It is annoying");
      </script>
   </head>
   <body>
      <h1>Below is rendered HTML using javascript</h1>
      <script>
         document.write("<h2>Hello world</h2>");
         document.write("<p>This document was last modified on "
             + document.lastModified + ".</p>");
      </script>
   </body>
</html>
The era of Node.js and V8 engine by google
- Node.js is a cross-platform, open-source JavaScript runtime environment that allows developers to create server-side and networking applications.
- Node.js is a server-side platform built on Google Chrome's JavaScript Engine (V8 Engine).
- Node.js was developed by Ryan Dahl in 2009 and its first version was released in 2010. Major new versions of Node.js are released annually.
- The platform runs on various operating systems.
- Node.js also provides a rich library of various JavaScript modules
- The popularity of node.js has grown significantly since its inception in 2009.
- The node package manager (
npm) is now the largest ecosystem of open-source libraries in the world with over than 1,000,000 packages available. - Node.js has also changed how we write JavaScript code. Prior to node, JavaScript was primarily used for client-side scripting within web browsers.
- Node's ability to run JavaScript on the server side has helped it to become one of the most popular programming languages in the world with over 10 million users as of 2019 according to Stack Overflow
Atwood’s Law
Atwood's Law is an observation made by Jeff Atwood in 2007 that has become known as Atwood's Law. The law states that "any application that can be written in JavaScript will eventually be written in JavaScript."
javascript
This tutorial will cover the basics of loops, variables, and data types in JavaScript. We'll also touch on some of the language's core features to give you a better understanding of how it works. By the end of this tutorial, you should have a good basic knowledge of these topics and be able to apply them when programming in JavaScript.
Before we dive in, let's take a look at what looping is and why it's important. Looping is a programming concept that allows you to repeat a block of code multiple times. This can be useful for tasks like iterating over an array or performing an operation on each item in a list. It's also one of the fundamental concepts in programming, so it's important to understand how it works.
There are two types of loops in JavaScript: for loops and while loops. For loops are typically used when you know how many times you want to execute the code block. While loops, on the other hand, will run the code block until a certain condition is met. We'll go over both types of loops in more detail below.
Now that we've covered what looping is and why it's useful, let's take a look at how to write a for loop in JavaScript. For loops consist of three parts: the initialization statement, the condition statement, and the increment statement. The initialization statement is executed once at the beginning of the loop and sets up the initial conditions for iteration. The condition statement is checked before each iteration and determines whether or not to run the code block. The increment statement is executed after each iteration and typically updates the counting variable used in the condition statement.
Javascript Loops
Here's an example of a for loop that counts from 1 to 10:
> for (var i = 1; i <= 3; i++) { console.log(i); }
1
2
3
Here's an example of awhile loop that counts down from 10 to 1:
var i = 3;
while (i > 3) {
    console.log(i);
    i--;
}
"Types" in JS are tricky
> var a = 2
undefined
> a
2
> a == "2"
true
> a == 2
true
> a === 2
true
> a === "2"
false
HTML
HTML is the standard markup language for creating web pages and web applications. With HTML you can create your own website. This tutorial will teach you the basics of HTML so that you can create your own web pages or web applications.
What is HTML?
HTML, HyperText Markup Language, is the standard markup language for creating web pages and web applications. HTML is used to structure the content of a web page. The content can be text, images, links, and other media.
How do I create an HTML document?
An HTML document starts with a DOCTYPE declaration. The DOCTYPE declares the type of document and the version of HTML used in the document:
<!DOCTYPE html>
<html>
...
</html>
HTML
All tags in an HTML document must be enclosed in angle brackets (< >). Tags are used to tell the browser how to display the content of a web page. Most tags have an opening tag (<tag>) and a closing tag (</tag>). The closing tag has the same name as the opening tag but with a slash (/). For example, there is an opening <p> tag for paragraphs and a closing </p> tag:
<p>This is a paragraph.</p><p>This is another paragraph.</p>
Some tags don't have a closing tag because they don't contain any content. These are called empty elements or void elements. For example, the empty element <br /> represents a line break:
This is some text.<br />This is some more text.
Javaescript
Javascript is a script programming language that can be used to add interactivity to websites. It is considered a client-side scripting language, meaning the code is written on the client computer and run by the browser rather than on the server. In this tutorial, we will cover some basic concepts of Javascript and how to use it in your webpages.
Basic Syntax
A Javascript program is made up of one or more statements. Each statement is ended with a semicolon (;). Statements can be written on one line or multiple lines. For example, the following two statements are equivalent:
statement1; statement2;

statement1;

statement2;
Data Types in JS
There are two types of data in Javascript: primitives and objects. Primitive data types include numbers, strings, and Boolean values (true or false). Numbers can be integers (whole numbers) or floating point numbers (decimals). Strings are a sequence of characters enclosed in quotes.Boolean values are either true or false.
 var num1 = 5; // integer
 var num2 = 3.14159 // floating point number
 var phrase = 'Hello world!'; // string
 var flag = true; // boolean value
Variables
Before you can use a variable in Javascript, you must declare it using the var keyword followed by the variable name. Variable names must start with a letter, underscore (_), or dollar sign ($) and can contain letters, numbers, underscores, and dollar signs afterwards.
var x; //declare x
x = 5; //assign 5 to x

var y = 10; //declare and assign
JavaScript's for-each loops
for (var variable in object) {
  if (object.hasOwnProperty(variable)) {
    // do something with variable
  }
}
````

For each property, the loop will return the name of the property as a string:
```javascript
var cars = {car1:"Saab", car2:"Volvo", car3:"BMW"};

for (x in cars) {    //returns "car1", "car2", and "car3" as strings
  console.log(cars[x]);              //returns the value of each property
}
Objects
Objects are more complex data types that can contain primitive data types as well as other objects. Objects are created using curly braces ({}). Properties are name/value pairs separated by colons (:), and each property is ended with a comma (,) except for the last one. Methods are functions associated with an object.
var car = {
    type: 'sedan',
    color: 'blue',
    drive: function() {
        method: console.log('The car is driving');
    }
};
JavaScript Objects (JSONs)
Objects in JavaScript, just like in most programming languages, are used to store data in key-value pairs.
In JavaScript, objects can be created using the Object() constructor or the object literal syntax.
The Object() constructor creates an object wrapper for a given value. If no value is passed, the new object will be empty.
var obj = new Object();
console.log(obj); // {}
The object literal syntax is used to create objects with pre-defined key-value pairs.
var obj = {};
console.log(obj); // {} THIS IS JSON!!!
You can also use the object literal syntax to create an object with key-value pairs already defined.
var obj = {name: 'John', age: 30};
console.log(obj); // {name: 'John', age: 30}
Classes
class Person {

  name;

  constructor(name) {
    this.name = name;
  }

  introduceSelf() {
    console.log(`Hi! I'm ${this.name}`);
  }

}
const john = new Person('John');

john.introduceSelf(); // Hi! I'm John
Classes
class Professor extends Person {

  teaches;

  constructor(name, teaches) {
    super(name);
    this.teaches = teaches;
  }

  introduceSelf() {
    console.log(`My name is ${this.name}, and I will be your ${this.teaches} professor.`);
  }

  grade(paper) {
    const grade = Math.floor(Math.random() * (5 - 1) + 1);
    console.log(grade);
  }

}
ref https://developer.mozilla.org/en-US/docs/Learn/JavaScript/Objects/Classes_in_JavaScript
Promises
A promise in JavaScript is an Object that promised to return a value at some point in the future. This is useful when you want to avoid blocking the main thread while waiting for an asynchronous task to complete, such as an HTTP request.
A promise has three states: - Pending: The initial state of a promise. The operation hasn't completed yet. - Fulfilled: The operation has completed and the promise has a value. - Rejected: The operation has failed and the promise has a reason for the failure.
You create a promise by using the new Promise constructor:
var promise = new Promise(function(resolve, reject) {
  // do something

  if (/* everything turned out fine */){
    resolve("Stuff worked!");
  } else {
    reject(Error("It broke"));   } });
````

# Promises

You use Promises by calling methods on them. The most important method is then, which registers callback functions for when a Promise is resolved or rejected. This returns a new Promise, which allows you to chain Promises together:

```javascript
promise.then(function(result) {
    console.log(result); // "Stuff worked!"
}, function(err) {
    console.log(err); // Error: "It broke"
});
You can also catch errors in your chains by registering a callback function with catch:
promise.then(function(result) {
  /* do something with result */ }
).catch(function(err) {
  /* handle err */ });
````

# CSS
Cascading Style Sheets (CSS) is a stylesheet language used to describe the presentation of a document written in a markup language. A style sheet is a collection of rules that tells a web browser how to display a document written in HTML or XML.

CSS is used to style all HTML tags, including the document's body, headings, paragraphs, and other pieces of text. CSS can also be used to style the display of table elements, grid elements, and images.

Here are some important concepts in CSS:

- Selectors: These are the HTML elements that you want to style.
- Properties: These are the attributes of an HTML element that you want to change.
- Values: These are the values that you want to set for the properties of an HTML element.

# CSS
In order to use CSS, you must first create a stylesheet. A stylesheet is a text file with the extension .css that contains your CSS rules. You can then link this stylesheet to your HTML document using the `<link>` tag.

Once you have created your stylesheet, you can start writing CSS rules. A CSS rule has two parts: a selector and a declaration.

The selector is the HTML element that you want to style. The declaration consists of two parts: a property and a value. The property is the attribute of the element that you want to change, and the value is what you want to set it to.

# CSS
In this example, we will make all paragraphs have red text:
```javascript
p {
  color: red;
}

body {
  background: #ffffff;
  font-family: "Helvetica Neue", Helvetica, Arial, sans-serif;
}

a {
  color: #0088cc;
  text-decoration: none;
}

a:hover {
  text-decoration: underline;
}

p {
  font-size: 13px; line-height: 1.6em; margin-bottom: 10px;
}
JavaScript asynchronous
Asynchronous programming is a programming paradigm that enables program execution to continue even when individual tasks, such as function calls, take longer to complete than expected. When a task is ready to be executed, it is placed in a queue of pending tasks and the program continues to execute the next task. When the task at the front of the queue is completed, it is removed from the queue and its results are returned to the program. Asynchronous programming can be used in both single-threaded and multi-threaded programs. In a single-threaded program, asynchronous programming can provide concurrency by allowing multiple tasks to be executed concurrently. In a multi-threaded program, asynchronous programming can improve performance by avoiding costly thread context switches.
JavaScript asynchronous Example
Consider a simple example: a function that calculates the sum of two numbers. The function can be expressed as follows:
function add(x, y) {
    var result = x + y;
    return result;
}
If we call this function with values 2 and 3, the result will be 5:
var result = add(2, 3); // 5
JavaScript asynchronous Example
Now consider what would happen if one of the numbers was very large (say, 1 million). Calculating the sum would take some time, during which the rest of the program would have to wait. This would not be very efficient.
We can make this example more efficient by expressing it as an asynchronous function:
function addAsync(x, y, callback) {
  var result = x + y;

  // Invoke the callback with the result:

  callback(result);
}
JavaScript asynchronous Example
In this version of the function, we pass in a callback function that will be called when the calculation is finished. The callback function takes care of returning the result to us. We can now call our function as follows:
addAsync(2, 3, function(result) {
    // Do something withthe result here...
    console.log('The sum is ' + result);
  });
Calling our asynchronous function looks very similar to calling a regular synchronous function except that we pass in an extra argument -the callback function. When we call an asynchronous function, we don't get back a return value immediately - instead, we get back a promise that indicates that a value will eventually be returned (or an error will eventually be thrown). This promise allows us to write code that doesn't block while waiting for a value to be returned.
Javascript live example online
https://embed.plnkr.co/plunk/8ujYdL1BxZftGoS4Cf14
ReactJS Web-UI
Installing
brew install node
npx create-react-app my-app
cd my-app
npm start
ReactJS example App.js (1/2)
import React, { Component } from "react";
import logo from "./logo.svg";
import "./App.css";

class App extends Component {
  constructor(props) {
    super(props);
    this.state = {
      inputText: "",
      counter: 0,
    };
  }

  handleClick = (event) => {
    console.log(event.target);
    const val = event.target.name === "Up" ? 1 : -1;
    this.setState({
      counter: this.state.counter + val,
    });
  };

  handleChange = (event) => {
    this.setState({
      inputText: event.target.value,
    });
  };

  handleGet = (event) => {
    fetch("http://httpbin.org/get")
      .then((response) => response.json())
      .then((data) => console.log(data));
  };
ReactJS example App.js (2/2)
  handleGet = (event) => {
    fetch("http://httpbin.org/get")
      .then((response) => response.json())
      .then((data) => console.log(data));
  };
ReactJS example App.js (3/3)
  render() {
    return (
      <div className="App">
        <header className="App-header">
          <img src={logo} alt="Logo" width="10%" />
          <input type="text" onChange={this.handleChange} value={this.state.inputText} />
          <p>{this.state.inputText}</p>
          <button name="Up" onClick={this.handleClick}>
            Up
          </button>
          <p>{this.state.counter}</p>
          <button name="Down" onClick={this.handleClick}>
            Down
          </button>
          <p>Perform HTTP GET to httpbin</p>
          <button onClick={this.handleGet}>HTTP get</button>
        </header>
      </div>
    );
  }
}

export default App;
``

# Testing

## Cypress
https://www.youtube.com/watch?v=iHou7-TgCpY


## Pyppetter
```bash
$ pip install pyppeteer
$ export DISPLAY=$(cat /etc/resolv.conf | grep nameserver | awk '{print $2; exit;}'):0.0
install Xserver
https://stackoverflow.com/a/66645230
import asyncio
from pyppeteer import launch


async def main():
    browser = await launch(headless=False)
    page = await browser.newPage()
    await page.goto("https://google.com")
    await page.screenshot({"path": "example.png"})
    await browser.close()


asyncio.get_event_loop().run_until_complete(main())
More examples
import asyncio
from pyppeteer import launch


async def main():
    browser = await launch()
    page = await browser.newPage()

    await page.goto('https://example.com')

    # J is an alias to querySelector
    input_el = await page.J('input[type="text"]')
    await input_el.type("Puppeteer")

    submit_el = await page.J('input[type="submit"]')
    await submit_el.click()

    assert 'Puppeteer' in (await page.content())

    browser.close()


asyncio.get_event_loop().run_until_complete(main())
Security concepts
- Password strength:
The strength of a password is determined by its length, complexity, and uniqueness. To ensure that passwords are strong, web applications should require passwords to be a minimum of eight characters in length and include a mix of uppercase and lowercase letters, numbers, and special characters. Passwords should also not be common words or easily guessed phrases.
- Encryption:
All data transmitted between the web server and web browser should be encrypted to protect it from being intercepted and read by third parties. Transport Layer Security (TLS) is the most common protocol used for encryption. When TLS is used, a padlock icon will typically appear in the web browser to indicate that the connection is secure.
TLS(Transport Layer Security) is a cryptographic protocol that provides communication security over the Internet. It has two main components: a public-key Infrastructure (PKI) to verify the identity of endpoints, and a symmetric-key mechanism to encrypt/decrypt data.
Intro to encryption
There are two types of encryption schemes: private-public key encryption and shared key encryption.
Private-public key encryption, also known as asymmetric key encryption, is a type of encryption where there are two different keys - a public key and a private key. The public key can be known by anyone and is used to encrypt data. The private key is only known by the recipient and is used to decrypt data.
Shared key encryption, also known as symmetric key encryption, is a type of encryption where there is only one key that is shared between the sender and the recipient. This key is used to both encrypt and decrypt data.
Symmetric encryption
pip install cryptography
import os
from cryptography.hazmat.primitives.ciphers import Cipher, algorithms, modes
key = os.urandom(32)
iv = os.urandom(16)
cipher = Cipher(algorithms.AES(key), modes.CBC(iv))
encryptor = cipher.encryptor()
ct = encryptor.update(b"a secret message") + encryptor.finalize()
decryptor = cipher.decryptor()
decryptor.update(ct) + decryptor.finalize()
Hash-based message authentication codes (HMAC)
from cryptography.hazmat.primitives import hashes, hmac
key = b'test key. Beware! A real key should use os.urandom or TRNG to generate'
h = hmac.HMAC(key, hashes.SHA256())
h.update(b"message to hash")
signature = h.finalize()
print(signature)
Verify
h = hmac.HMAC(key, hashes.SHA256())
h.update(b"message to hash")
h_copy = h.copy() # get a copy of `h' to be reused
h.verify(signature)
Private-Public key (RSA)
from cryptography.hazmat.primitives.asymmetric import rsa
private_key = rsa.generate_private_key(
    public_exponent=65537,
    key_size=2048,
)
public_key = private_key.public_key()
Private-Public key (RSA) - signing
from cryptography.hazmat.primitives import hashes
from cryptography.hazmat.primitives.asymmetric import padding
message = b"A message I want to sign"
signature = private_key.sign(
    message,
    padding.PSS(
        mgf=padding.MGF1(hashes.SHA256()),
        salt_length=padding.PSS.MAX_LENGTH
    ),
    hashes.SHA256()
)
Private-Public key (RSA) Sign-Verify
Sign
from cryptography.hazmat.primitives import hashes
from cryptography.hazmat.primitives.asymmetric import padding
message = b"A message I want to sign"
signature = private_key.sign(
    message,
    padding.PSS(
        mgf=padding.MGF1(hashes.SHA256()),
        salt_length=padding.PSS.MAX_LENGTH
    ),
    hashes.SHA256()
)
Verify
public_key = private_key.public_key()
public_key.verify(
    signature,
    message,
    padding.PSS(
        mgf=padding.MGF1(hashes.SHA256()),
        salt_length=padding.PSS.MAX_LENGTH
    ),
    hashes.SHA256()
)
Private-Public key (RSA) Encrypt-Decrypt
Encrypt
message = b"encrypted data"
ciphertext = public_key.encrypt(
    message,
    padding.OAEP(
        mgf=padding.MGF1(algorithm=hashes.SHA256()),
        algorithm=hashes.SHA256(),
        label=None
    )
)
Decrypt
plaintext = private_key.decrypt(
    ciphertext,
    padding.OAEP(
        mgf=padding.MGF1(algorithm=hashes.SHA256()),
        algorithm=hashes.SHA256(),
        label=None
    )
)
plaintext == message
TLS example in python
TLS(Transport Layer Security) is a cryptographic protocol that provides communication security over the Internet. It has two main components: a public-key Infrastructure (PKI) to verify the identity of endpoints, and a symmetric-key mechanism to encrypt/decrypt data.
openssl req -new -x509 -days 365 -nodes -out cert.pem -keyout key.pem
client.py
from socket import create_connection
from ssl import SSLContext, PROTOCOL_TLS_CLIENT


hostname = "HIT.COM"
ip = "127.0.0.1"
port = 8443
context = SSLContext(PROTOCOL_TLS_CLIENT)
context.load_verify_locations("cert.pem")

with create_connection((ip, port)) as client:
    with context.wrap_socket(client, server_hostname=hostname) as tls:
        print(f"Using {tls.version()}\n")
        tls.sendall(b"PING")

        data = tls.recv(1024)
        print(f"Server says: {data}")
server.py
from socket import socket, AF_INET, SOCK_STREAM
from ssl import SSLContext, PROTOCOL_TLS_SERVER


ip = "127.0.0.1"
port = 8443
context = SSLContext(PROTOCOL_TLS_SERVER)
context.load_cert_chain("cert.pem", "key.pem")


with socket(AF_INET, SOCK_STREAM) as server:
    server.bind((ip, port))
    server.listen(1)

    with context.wrap_socket(server, server_side=True) as tls:
        while True:
            connection, address = tls.accept()
            print(f"Connected by {address}\n")

            data = connection.recv(1024)
            print(f"Client Says: {data}")

            connection.sendall(b"PONG")
login with google OAuth
$ npx create-react-app demo-login-google
$ npm install --force react-google-login # to make sure react version is compatible
cd demo-login-google npm start
import logo from './logo.svg';
import './App.css';

import React from 'react';
import GoogleLogin from 'react-google-login';

function Login() {

  const responseGoogle = (response) => {
    console.log(response);
  };

  return (
    <div>
      <GoogleLogin
        clientId="973485012429-jdemkanneidu38bp284i1rr0hoi9uojr.apps.googleusercontent.com"
        buttonText="Login"
        onSuccess={responseGoogle}
        onFailure={responseGoogle}
        cookiePolicy={'single_host_origin'}
      />
    </div>
  );
}
login with google OAuth
function App() {
  return (
    <div className="App">
      <header className="App-header">
        <img src={logo} className="App-logo" alt="logo" />
        <p>
          Edit <code>src/App.js</code> and save to reload.
        </p>
        <a
          className="App-link"
          href="https://reactjs.org"
          target="_blank"
          rel="noopener noreferrer"
        >
          Learn React
        </a>
      </header>
      <Login />
    </div>
  );
}

export default App;
Using Google OAuth2
OAuth2 is an open standard for authorization that provides a way for users to grant third-party access to their resources without sharing their passwords. It works by delegating user authentication to the service that hosts the user's account, and authorizing third-party applications to access the user's resources using a standardized method.
- Go to https://console.developers.google.com/projectcreate and create a project
- Create credentials https://console.developers.google.com/apis/credentials
- Choose OAuth client ID
- Select Web application type
Using Google OAuth2
- Go to https://console.developers.google.com/projectcreate and create a project
- Create credentials https://console.developers.google.com/apis/credentials
- Choose OAuth client ID
- Select Web application type
 {width=250px}
Using Google OAuth2
- Go to https://console.developers.google.com/projectcreate and create a project
- Create credentials https://console.developers.google.com/apis/credentials
- Choose OAuth client ID
- Select Web application type
 {width=250px}
Using Google OAuth2
- Go to https://console.developers.google.com/projectcreate and create a project
- Create credentials https://console.developers.google.com/apis/credentials
- Choose OAuth client ID
- Select Web application type
 {width=250px}
Using Google OAuth2
- Go to https://console.developers.google.com/projectcreate and create a project
- Create credentials https://console.developers.google.com/apis/credentials
- Choose OAuth client ID
- Select Web application type
 {width=250px}
ref
https://dev.to/sivaneshs/add-google-login-to-your-react-apps-in-10-mins-4del
Security concepts
- Authentication:
Users of a web application should be authenticated before being granted access to sensitive information or functionality. There are many different authentication methods that can be used, such as password-based authentication or two-factor authentication using a code generated by an app on a user’s mobile device.
- Authorization:
After a user has been authenticated, the web application needs to determine what they are authorized to do within the application. This usually involves assigning users to roles with different levels of access, such as Admin, Manager, or User. Once again, there are many different ways that this can be implemented depending on the requirements of the application.
Examples
There are many ways to secure a web application in node.js. Some common methods are discussed below.
1) Authentication and Authorization:
One of the most important aspects of security is authentication and authorization. Authentication is the process of verifying that a user is who they claim to be, while authorization is the process of verifying that a user has permission to access a particular resource.
There are many different ways to implement authentication and authorization, but one popular approach is to use JSON Web Tokens (JWTs). JWTs are an open standard (RFC 7519) that defines a compact and self-contained way for securely transmitting information between parties as a JSON object.
JWT is a standard to codify a JSON object in a long dense string without spaces. It is not encrypted, so, anyone could recover the information from the contents. But it's signed. So, when you receive a token that you emitted, you can verify that you actually emitted it.
JWT
RS256 (RSA Signature with SHA-256) is an asymmetric algorithm, and it uses a public/private key pair: the identity provider has a private (secret) key used to generate the signature, and the consumer of the JWT gets a public key to validate the signature. Since the public key, as opposed to the private key, doesn't need to be kept secured, most identity providers make it easily available for consumers to obtain and use (usually through a metadata URL).
HS256 (HMAC with SHA-256), on the other hand, involves a combination of a hashing function and one (secret) key that is shared between the two parties used to generate the hash that will serve as the signature. Since the same key is used both to generate the signature and to validate it, care must be taken to ensure that the key is not compromised.
Demo: https://jwt.io/ Video: https://www.youtube.com/watch?v=7Q17ubqLfaM Post: https://developer.okta.com/blog/2018/06/20/what-happens-if-your-jwt-is-stolen
//Create a new token with the payload //(usually this would be done after authenticating the user)
const jwt = require('jsonwebtoken'); const token = jwt.sign({id: 1, username: 'test'}, 'secretkey'); console.log(token);
// eyJhbGciOiJIUzI1NiIsInR5cCI6IkpXVCJ9.eyJpZCI6MSwidXNlcm5hbWUiOiJ0ZXN0In0.-dnYgba7yv4F_A12KVTHKA
//Verify the token against the secret key
const jwt = require('jsonwebtoken'); const decoded = jwt.verify(token, 'secretkey'); console.log(decoded); // { id: 1, username: 'test' }
//If the token is invalid, an error will be thrown
const jwt = require('jsonwebtoken'); try { const decoded = jwt.verify(token, 'secretkey'); } catch (err) { console.error(err); /*Invalid token - could not be verified */ }
Security concepts
2) Hashing and Salting:
Another important aspect of security is hashing and salting passwords. Hashing is the process of converting a password into a fixed length string of characters that cannot be reversed, while salting is the process of adding random data to the password before it is hashed in order to make it more difficult to crack by brute force methods.
There are many different algorithms that can be used for hashing and salting passwords, but one popular choice is bcrypt. Bcrypt is designed specifically for hashing passwords and includes features like automatically generated salt and support for multiple rounds of hashing, which makes it more resistant to brute force attacks than other algorithms.
//Hash a password with bcrypt const bcrypt = require('bcrypt'); const password = 'password'; bcrypt .hash(password , 10 ) .then((hash) => { console .log(hash ); //$2a$10$/OKd7Yjj4iLHFtEuozmHVeqvbZTKCql3/rbnKnuEr7mrAEdyzsN2 }) ;
Security concepts
There are many ways to secure a web application written in Node.js. Some common methods include using secure HTTP headers, using a web application firewall (WAF), and encrypting data.
Secure HTTP Headers:
HTTP headers are name-value pairs that are sent in the request and response between the client and server. There are a number of headers that can be used to increase security, including:
X-Content-Type-Options: This header tells the browser not to try to guess the MIME type of the response, which can prevent certain types of attacks.
Strict-Transport-Security: This header tells the browser to only connect to the server using HTTPS, even if someone tries to connect using HTTP.
X-Frame-Options: This header prevents clickjacking attacks by telling the browser not to display content from this site in an iframe.
Content-Security-Policy: This header allows you to specify which sources of content are allowed on your page, which can help mitigate XSS and other types of injection attacks.
Security concepts
Using a WAF:
A web application firewall (WAF) is a piece of software that filters requests coming into your website or application. It can block requests based on a number of different factors, including IP address, cookies, headers, and more. A WAF can be a good way to add an extra layer of protection to your app.
Encrypting Data:
encryption is a process of transforming readable data into an unreadable format. The data can be transformed back into its original form using a decryption key . When data is encrypted, it helps protect against eavesdropping and tampering . Tampering is when someone modifies data without permission , while eavesdropping is when someone secretly views data .
Security concepts
Adding HTTPS to your Node.js web application is important for two reasons:
1) It ensures that all data passing between your server and clients is encrypted, so that people with malicious intent cannot intercept and read it.
2) It adds an extra layer of security by verifying the identity of your server, so that clients can be sure they are not being redirected to a fake or malicious site.
To add HTTPS to your Node.js web application, you will need to:
1) Get a SSL Certificate. You can either purchase one from a trusted Certificate Authority, or generate a self-signed certificate.
2) Configure your Node.js web server to use the SSL certificate. This will usually involve setting up a virtual host with an SSL port (usually 443).
3) Redirect all HTTP traffic to HTTPS. This can be done using redirect rules in your web server configuration, or by setting up a separate redirector server which sends all HTTP traffic to the HTTPS site.
OWASP (Open Web Application Security Project)-Top 10 Security risks in web applications
- Injection flaws – accessing and manipulating data entered into web applications through user input, such as via SQL or shell injection. Example code snippet:
var username = 'admin'; var password = '1234';
connection.query('SELECT * FROM users WHERE username = ' + username + ' AND password = ' + password, function(err, results) {
  if (err) { throw err; }
  // do something with results
});
Example: http://sqlfiddle.com/#!2/fd8be/1
'' OR 1=1 LIMIT 1
- Cross-site scripting (XSS) – tricks attackers use to inject malicious scripts into webpages viewed by other users. Example code snippet:
<script>alert('You have been hacked!');</script>
OWASP (Open Web Application Security Project)-Top 10 Security risks in web applications
- Broken authentication and session management – weak and easily guessed passwords, session ID vulnerabilities, cookies that are either easily guessable or stolen by third-party attackers.
- Insufficient logging and monitoring – not tracking application activity or knowing what has happened in the past makes it difficult to determine what is happening on the systems today and makes it more difficult to find and fix issues.
- Insecure communications – using outdated or unsalted encryption methods, not verifying SSL/TLS certificates, and not verifying message integrity.
- Broken access controls – granting users too much access, misconfigured role-based access controls, lack of least privilege model.
OWASP Top 10 Security risks in web applications
- Security misconfiguration – insecure file permissions, revealing sensitive information in error messages, leaving servers and applications publicly exposed without protection.
- Unvalidated and untested inputs – feeding unvalidated user input directly into web application functions,such as search results, comments, contact forms, etc., can lead to serious security vulnerabilities .
- Insufficient security controls – failing to deploy standard security measures, such as firewalls, intrusion detection/prevention systems, proper access control measures, etc. can leave an organization’s assets wide open to attacks.
- Poor software design – insecure coding practices, coding errors that can be exploited for malicious purposes , insecure configuration options ,Race conditions where two threads of execution compete for the same resource.
Authentication
Node.js provides a module called " passport" which helps you authenticate your users easily. You can use different strategies like Local, Facebook, Twitter etc., depending on your requirement. For example,
var passport = require('passport'),
    LocalStrategy = require('passport-local').Strategy;
passport.use(new LocalStrategy(function(username, password, done) {
    User.findOne({
        username: username
    }, function(err, user) {
        if (err) {
            return done(err);
        }
        if (!user) {
            return done(null, false);
        }
        if (!user.verifyPassword(password)) {
            return done(null, false);
        }
        return done(null, user);
    });
}));
Authorization:
Once the user is authenticated, you need to check if the user has sufficient permissions to access the requested resource. This can be easily achieved using Node's built-in module "acl". For example,
var acl = require('acl'); // Define roles
acl.allow([{
    roles: ['admin'],
    allows: [{
        resources: 'blogs',
        permissions: '*'
    }, {
        resources: 'users',
        permissions: ['get', 'put', 'delete']
    }]
}, {
    roles: ['editor'],
    allows: [{
        resources: 'blogs',
        permissions: ['post', 'put']
    }]
}, {
    roles: {
        guest: '*'
    }
}]);
// Check role and permission
acl.isAllowed('admin', 'blogs', 'get', function(err, result) {
    console.log(result);
}); // output : true
Python
Example 1:
from fastapi import FastAPI, HTTPException
from fastapi.security import OAuth2PasswordRequestForm

app = FastAPI()


@app.get("/")
def read_root():
    return {"Hello": "World"}


@app.get("/items/{item_id}")
def read_item(item_id: int, q: str = None):
    return {"item_id": item_id, "q": q}


@app.post("/login")
def login(form_data: OAuth2PasswordRequestForm = Depends()):

    if form_data.username != "test" or form_data.password != "test":
        raise HTTPException(status_code=400, detail="Incorrect username or password")

    return {"access_token": "fake-super-secret-access-token", "token_type": "bearer"}
There are many ways to secure FastAPI endpoints, but some common methods are:
Basic Authentication
from fastapi import Depends, FastAPI
from fastapi.security import HTTPBasic, HTTPBasicCredentials

app = FastAPI()

security = HTTPBasic()


@app.get("/users/me")
def read_current_user(credentials: HTTPBasicCredentials = Depends(security)):
    return {"username": credentials.username, "password": credentials.password}
Basic Authentication
from fastapi import FastAPI
from fastapi.security import HTTPBasic, HTTPBasicCredentials

app = FastAPI()
security = HTTPBasic()


@app.get("/")
def read_root():
    return {"message": "Hello World"}


@app.get("/items/{item_id}")
def read_item(item_id: int, credentials: HTTPBasicCredentials = Depends(security)):
    if credentials.username == "trudy" and credentials.password == "secret":
        return {"item_id": item_id, "message": "Welcome Trudy!"}
    else:
        return {"message": "Invalid username or password"}
Basic Authentication Against Timing Attacks
import secrets
from fastapi import Depends, FastAPI, HTTPException, status
from fastapi.security import HTTPBasic, HTTPBasicCredentials

app = FastAPI()
security = HTTPBasic()

def get_current_username(credentials: HTTPBasicCredentials = Depends(security)):
    correct_username = secrets.compare_digest(credentials.username, "user")
    correct_password = secrets.compare_digest(credentials.password, "pass")
    if not (correct_username and correct_password):
        raise HTTPException(
            status_code=status.HTTP_401_UNAUTHORIZED,
            detail="Incorrect email or password",
            headers={"WWW-Authenticate": "Basic"},
        )
    return credentials.username

@app.get("/users/me")
def read_current_user(username: str = Depends(get_current_username)):
    return {"username": username}
ref
https://fastapi.tiangolo.com/advanced/security/http-basic-auth/
Token Based Authentication:
from fastapi import FastAPI
from fastapi.security import OAuth2PasswordRequestForm, OAuth2PasswordBearer

app = FastAPI()
security = OAuth2PasswordBearer(tokenUrl="/token", scheme_name="Bearer")


@app.post("/token")
async def get_access_token(form_data: OAuth2PasswordRequestForm = Depends()):
    if form_data.username == "test" and form_data.password == "test":
        access_token_expires = timedelta(minutes=10)
        access_token = create_access_token(
            subject=form_data.username, expires_delta=access_token_expires
        )
        return {"accessToken": access_token}


@app.get("/secure")
@security("Bearer", scopes=["read:users"])
async def read_users():
    return [
        {"id": 1, "name": "Bob"},
        {"id": 2, "name": "Joe"},
    ]
OAuth2 and JWT
JWT (JSON Web Tokens)- It is just a token format. JWT tokens are JSON encoded data structures contains information about issuer, subject (claims), expiration time etc. It is signed for tamper proof and authenticity and it can be encrypted to protect the token information using symmetric or asymmetric approach. JWT is simpler than SAML 1.1/2.0 and supported by all devices and it is more powerful than SWT(Simple Web Token). OAuth2 — OAuth2 solve a problem that user wants to access the data using client software like browse based web apps, native mobile apps or desktop apps. OAuth2 is just for authorization, client software can be authorized to access the resources on-behalf of end user using access token.
$ pip install pyjwt
>>> import jwt
>>> encoded_jwt = jwt.encode({"some": "payload"}, "secret", algorithm="HS256")
>>> print(encoded_jwt)
eyJ0eXAiOiJKV1QiLCJhbGciOiJIUzI1NiJ9.eyJzb21lIjoicGF5bG9hZCJ9.Joh1R2dYzkRvDkqv3sygm5YyK8Gi4ShZqbhK2gxcs2U
>>> jwt.decode(encoded_jwt, "secret", algorithms=["HS256"])
{'some': 'payload'}
OAuth2 Authentication (1/7)
from datetime import datetime, timedelta

from fastapi import Depends, FastAPI, HTTPException, status
from fastapi.security import OAuth2PasswordBearer, OAuth2PasswordRequestForm
from jose import JWTError, jwt
from passlib.context import CryptContext
from pydantic import BaseModel

# to get a string like this run:
# openssl rand -hex 32
SECRET_KEY = "09d25e094faa6ca2556c818166b7a9563b93f7099f6f0f4caa6cf63b88e8d3e7"
ALGORITHM = "HS256"
ACCESS_TOKEN_EXPIRE_MINUTES = 30


fake_users_db = {
    "johndoe": {
        "username": "johndoe",
        "full_name": "John Doe",
        "email": "johndoe@example.com",
        "hashed_password": "$2b$12$EixZaYVK1fsbw1ZfbX3OXePaWxn96p36WQoeG6Lruj3vjPGga31lW",
        "disabled": False,
    }
}
OAuth2 Authentication (2/7)
class Token(BaseModel):
    access_token: str
    token_type: str


class TokenData(BaseModel):
    username: str | None = None


class User(BaseModel):
    username: str
    email: str | None = None
    full_name: str | None = None
    disabled: bool | None = None


class UserInDB(User):
    hashed_password: str
OAuth2 Authentication (3/7)
pwd_context = CryptContext(schemes=["bcrypt"], deprecated="auto")

oauth2_scheme = OAuth2PasswordBearer(tokenUrl="token")

app = FastAPI()


def verify_password(plain_password, hashed_password):
    return pwd_context.verify(plain_password, hashed_password)


def get_password_hash(password):
    return pwd_context.hash(password)


def get_user(db, username: str):
    if username in db:
        user_dict = db[username]
        return UserInDB(**user_dict)


def authenticate_user(fake_db, username: str, password: str):
    user = get_user(fake_db, username)
    if not user:
        return False
    if not verify_password(password, user.hashed_password):
        return False
    return user
OAuth2 Authentication (4/7)
def create_access_token(data: dict, expires_delta: timedelta | None = None):
    to_encode = data.copy()
    if expires_delta:
        expire = datetime.utcnow() + expires_delta
    else:
        expire = datetime.utcnow() + timedelta(minutes=15)
    to_encode.update({"exp": expire})
    encoded_jwt = jwt.encode(to_encode, SECRET_KEY, algorithm=ALGORITHM)
    return encoded_jwt
OAuth2 Authentication (5/7)
async def get_current_user(token: str = Depends(oauth2_scheme)):
    credentials_exception = HTTPException(
        status_code=status.HTTP_401_UNAUTHORIZED,
        detail="Could not validate credentials",
        headers={"WWW-Authenticate": "Bearer"},
    )
    try:
        payload = jwt.decode(token, SECRET_KEY, algorithms=[ALGORITHM])
        username: str = payload.get("sub")
        if username is None:
            raise credentials_exception
        token_data = TokenData(username=username)
    except JWTError:
        raise credentials_exception
    user = get_user(fake_users_db, username=token_data.username)
    if user is None:
        raise credentials_exception
    return user
OAuth2 Authentication (6/7)
async def get_current_active_user(current_user: User = Depends(get_current_user)):
    if current_user.disabled:
        raise HTTPException(status_code=400, detail="Inactive user")
    return current_user


@app.post("/token", response_model=Token)
async def login_for_access_token(form_data: OAuth2PasswordRequestForm = Depends()):
    user = authenticate_user(fake_users_db, form_data.username, form_data.password)
    if not user:
        raise HTTPException(
            status_code=status.HTTP_401_UNAUTHORIZED,
            detail="Incorrect username or password",
            headers={"WWW-Authenticate": "Bearer"},
        )
    access_token_expires = timedelta(minutes=ACCESS_TOKEN_EXPIRE_MINUTES)
    access_token = create_access_token(
        data={"sub": user.username}, expires_delta=access_token_expires
    )
    return {"access_token": access_token, "token_type": "bearer"}
OAuth2 Authentication (7/7)
@app.get("/users/me/", response_model=User)
async def read_users_me(current_user: User = Depends(get_current_active_user)):
    return current_user


@app.get("/users/me/items/")
async def read_own_items(current_user: User = Depends(get_current_active_user)):
    return [{"item_id": "Foo", "owner": current_user.username}]
ref
https://fastapi.tiangolo.com/tutorial/security/oauth2-jwt/
Good luck to all of us
{ width=150px }
Be active on EASS discord and try to learn and help each other as much as you can.
Triage
node.js react https://docs.microsoft.com/en-us/visualstudio/docker/tutorials/docker-tutorial https://github.com/docker/awesome-compose/tree/master/fastapi https://luminousmen.com/post/what-are-the-best-engineering-principles https://developer.mozilla.org/en-US/docs/Learn/JavaScript/Asynchronous/Concepts gdb profiling debugging ipdb basic security https://owasp.org/www-project-top-ten/ https://owasp.org/Top10/ functional programming https://streamlit.io/gallery + httpx https://github.com/romanvm/python-web-pdb https://codeburst.io/implement-a-production-ready-rest-service-using-fastapi-13f284562c75